开启HTTP Strict Transport Security (HSTS) 2023-06-02 网站 暂无评论 3264 次阅读 #For apache httpd Verify if Apache HTTPD Headers module is enabled at /etc/httpd/conf/httpd.conf ``` LoadModule headers_module modules/mod_headers.so ``` Add the following configuration globally at /etc/httpd/conf.d/ssl.conf to `<VirtualHost *:443>` virtual host or for each SSL-enabled virtual host: (也可能在/etc/apache2/sites-enabled/website.conf 和 /etc/apache2/httpd.conf ) ``` Header always set Strict-Transport-Security "max-age=63072000; includeSubdomains; preload" ``` Restart the httpd service ``` systemctl restart httpd ``` Verify the configuration ``` curl -v -A cUrl -k https://ol7-olvm ``` 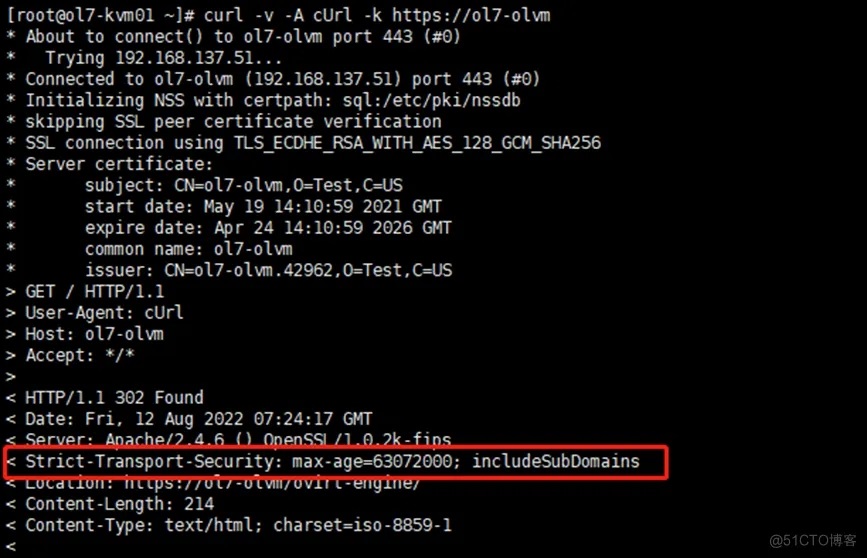 #For nginx Backup the nginx config file ``` cp /etc/nginx/nginx.conf /etc/nginx/nginx.conf.bak ``` Add the following to nginx.conf ``` add_header X-XSS-Protection "1; mode=block"; add_header X-Content-Type-Options nosniff; add_header Strict-Transport-Security "max-age=31536000; includeSubDomains" always; ``` 网上看有些朋友直接添加在 server 块中无效的情况,或许可以试试直接插入到 `location ~ *php` 内: ``` location ~ [^/]\.php(/|$) { add_header Strict-Transport-Security "max-age=63072000; includeSubdomains; preload"; ``` Restart the nginx service ``` systemctl restart nginx ``` #For IIS 确认是否安装 “URL 重写” 或者 “URL Rewrite” 模块 , 如果您已经安装可以跳过。 “URL重写” 模块下载地址 ``` https://www.iis.net/downloads/microsoft/url-rewrite#additionalDownloads ``` 已经安装模块的话,在iis的界面可以看到如下图所示的图标: 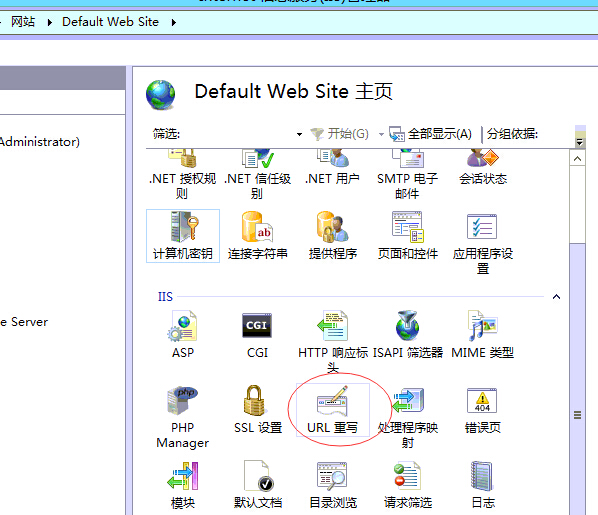 点击“添加规则” 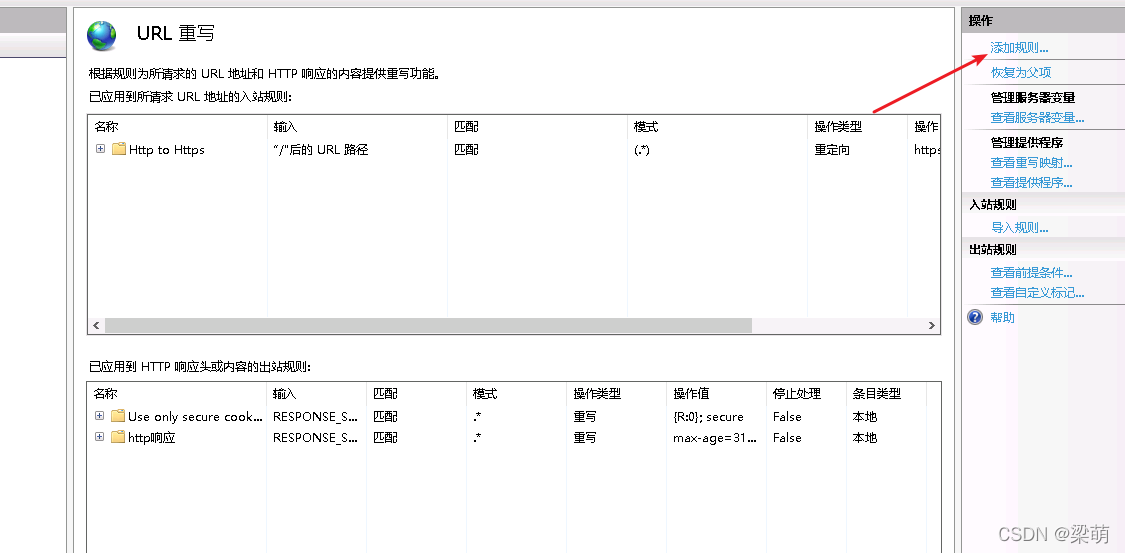 在“出站规则” 中 选择“空白规则” 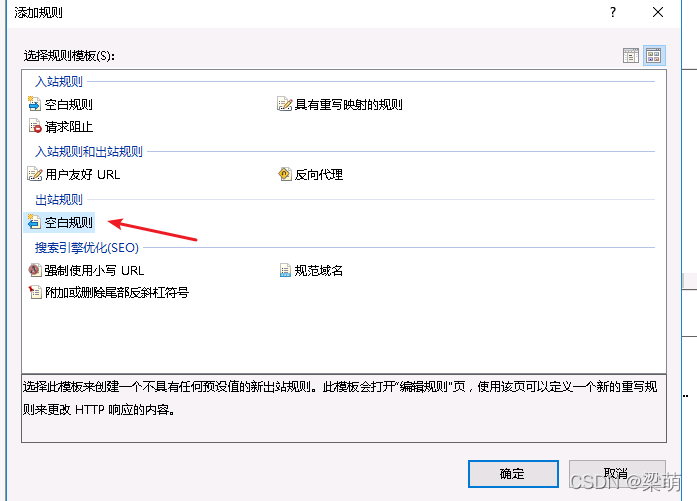 名称:http响应 变量名称:`RESPONSE_Strict_Transport_Security` 模式: `.*` 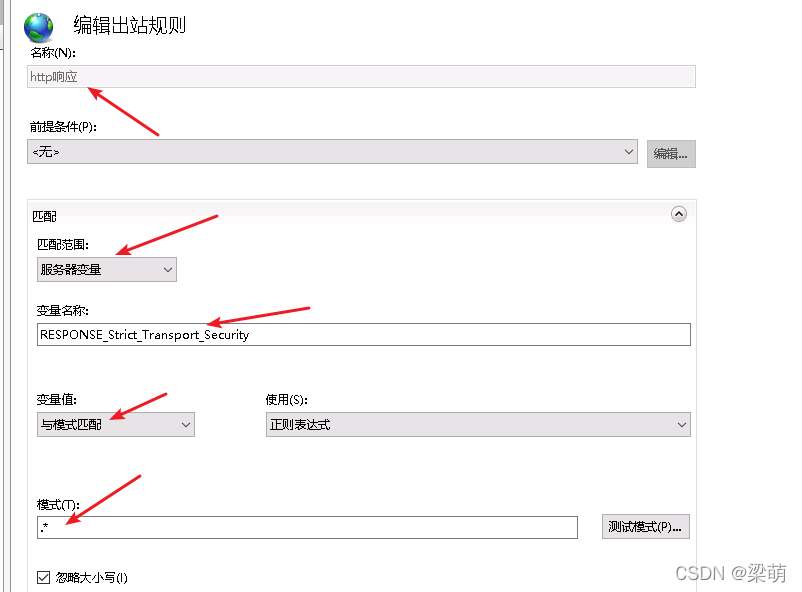 在“条件”模块中选择“添加” 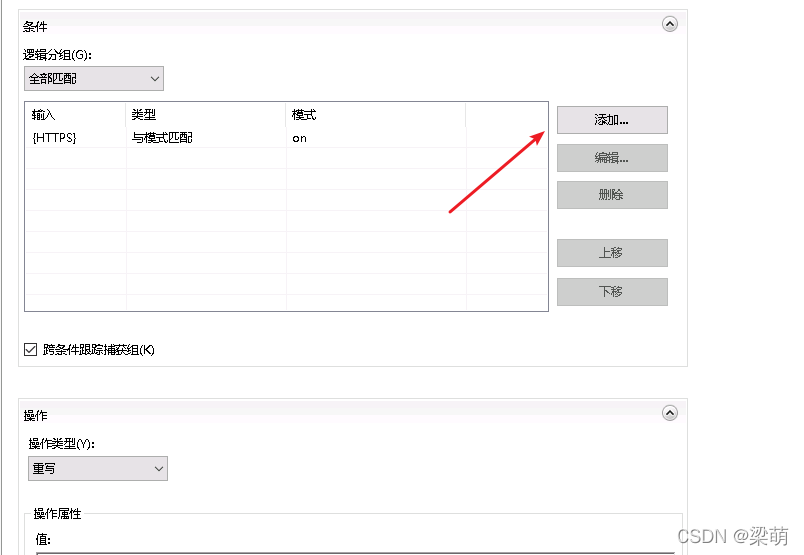 条件输入:`{HTTPS}` 模式:`on` 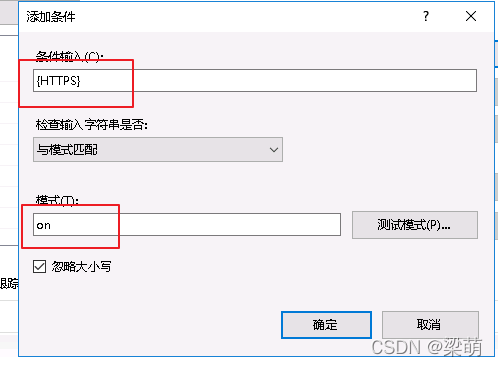 值:`max-age=31536000`  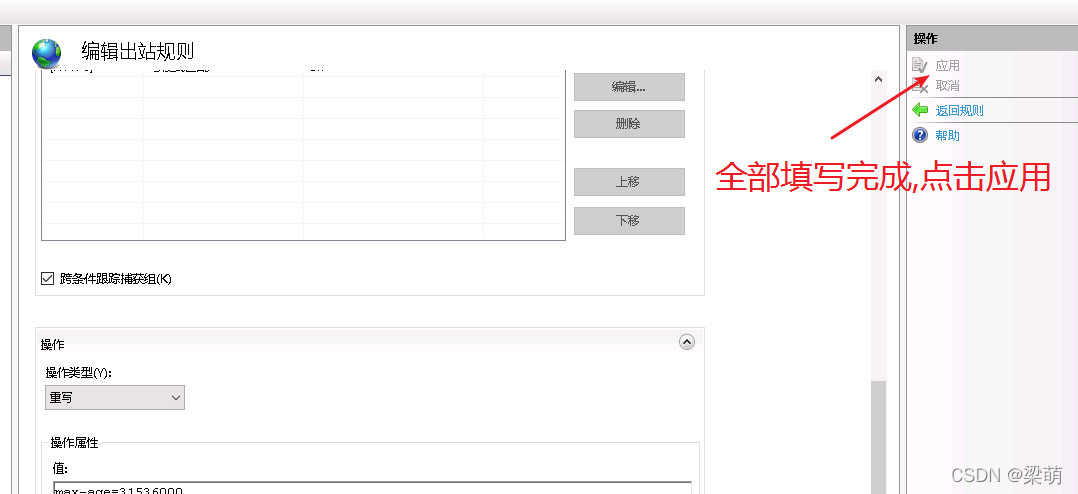 操作完成后在配置文件web.config中会自动增加如下配置项: 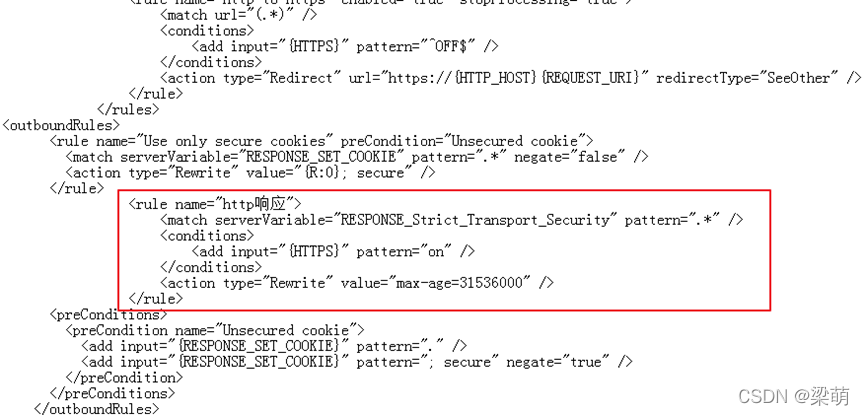 #For Tomcat 如果仅对单个系统进行操作,修改项目目录中的web.xml文件。 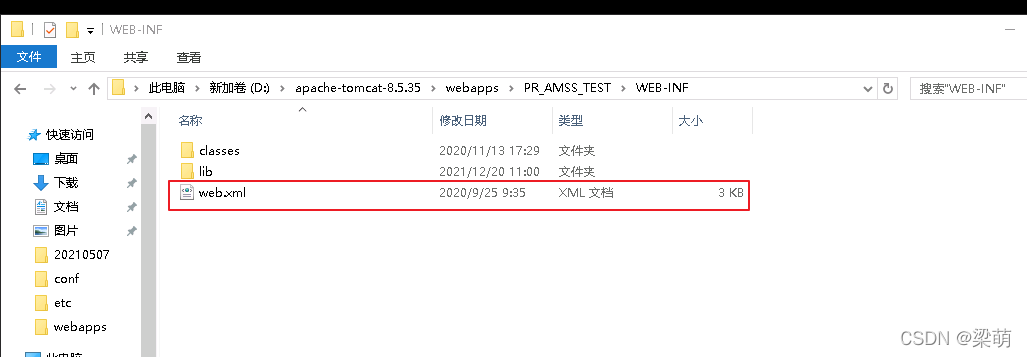 如果对tomcat下所有系统进行操作,修改tomcat/conf录中的web.xml文件。 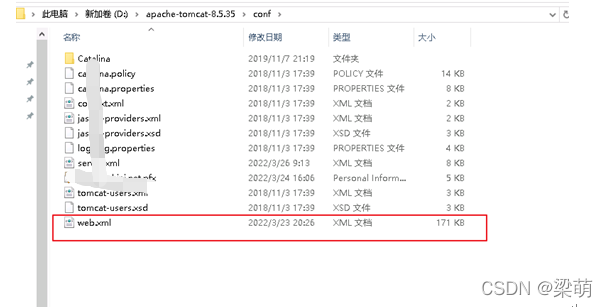 需要修改的内容如下图所示,在原来的文件中添加红色方框内的配置。 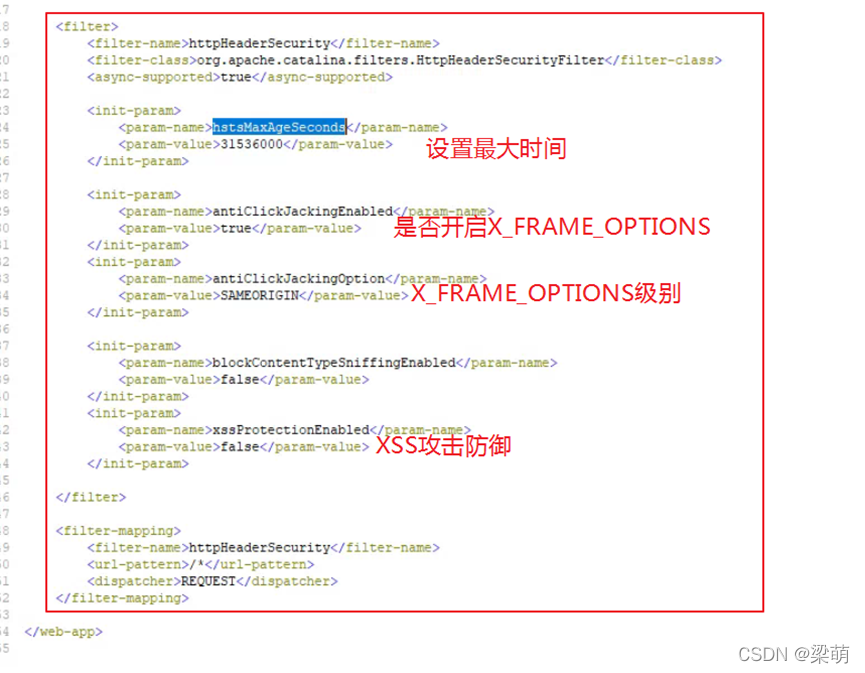 ``` <filter> <filter-name>httpHeaderSecurity</filter-name> <filter-class>org.apache.catalina.filters.HttpHeaderSecurityFilter</filter-class> <async-supported>true</async-supported> <init-param> <param-name>hstsMaxAgeSeconds</param-name> <param-value>31536000</param-value> </init-param> <init-param> <param-name>antiClickJackingEnabled</param-name> <param-value>true</param-value> </init-param> <init-param> <param-name>antiClickJackingOption</param-name> <param-value>SAMEORIGIN</param-value> </init-param> <init-param> <param-name>blockContentTypeSniffingEnabled</param-name> <param-value>false</param-value> </init-param> <init-param> <param-name>xssProtectionEnabled</param-name> <param-value>false</param-value> </init-param> </filter> <filter-mapping> <filter-name>httpHeaderSecurity</filter-name> <url-pattern>/*</url-pattern> <dispatcher>REQUEST</dispatcher> </filter-mapping> ``` ##验证是否操作成功 通过浏览器访问网站,根据服务器返回的响应头信息,可以看出包含Strict-Transport-Security属性, 表明问题已修复。  ##Tomcat配置参数说明 开启HTST默认会将antiClickJackingEnabled属性设置为true,antiClickJackingOption设置为DENY,这会直接导致当前页面不允许以iframe窗体的形式显示在任何系统中。 下面分情况说明相关配置: 下面涉及的文件为web.xml文件 ##情况一:允许任意网站以iframe窗体形式引用 如果当前网页可以被任何页面以iframe窗体形式引用,可以直接将antiClickJackingEnabled属性设置为false即可。 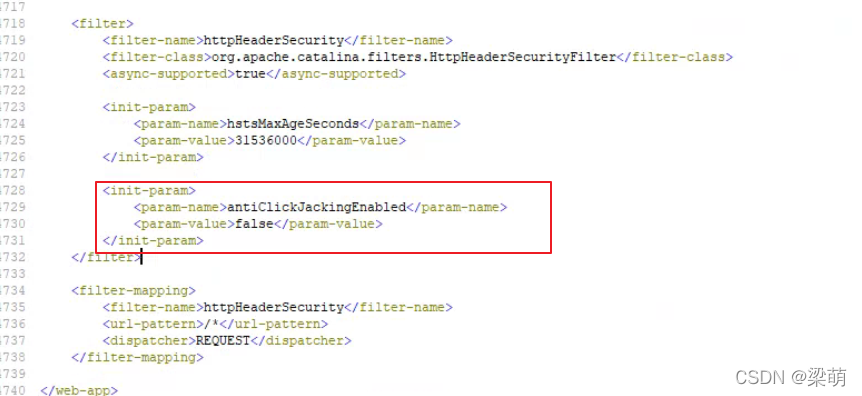 ``` <init-param> <param-name>antiClickJackingEnabled</param-name> <param-value>false</param-value> </init-param> ``` ##情况二:允许部分网站以iframe窗体形式引用 如果只允许部分系统以iframe窗体形式引用当前网页,可以通过设置antiClickJackingOption的属性值,达到不同级别的控制。 antiClickJackingOption的属性值包括: DENY:页面不能被嵌入到任何iframe或者frame中 SAMEORIGIN:页面只能被本站页面嵌入到iframe或者frame中。 ALLOW-FROM:页面只能被嵌入到指定域名的框架中。 如果允许当前网站可以被本网站嵌入到iframe或者frame中,将antiClickJackingOption设置为SAMEORIGIN。 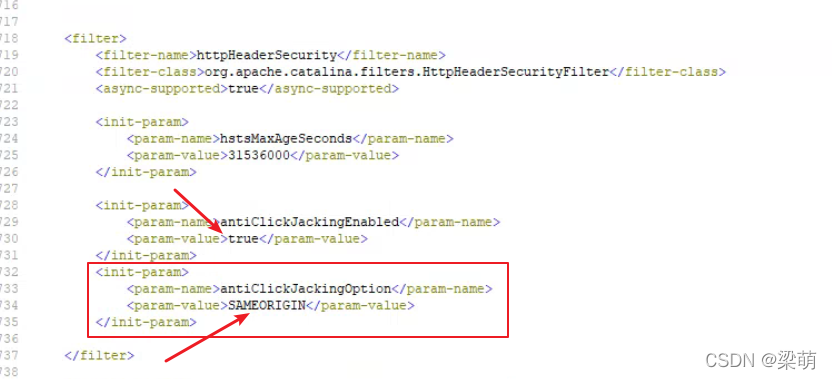 ``` <init-param> <param-name>antiClickJackingEnabled</param-name> <param-value>true</param-value> </init-param> <init-param> <param-name>antiClickJackingOption</param-name> <param-value>SAMEORIGIN</param-value> </init-param> ``` 如果要配置指定的网站才有权限可以嵌入当前页面,将antiClickJackingOption设置为ALLOW-FROM。同时配置antiClickJackingUri属性,设置被允许的网站地址。 下面示例表示允许baidu网站中可以嵌入当前页面。 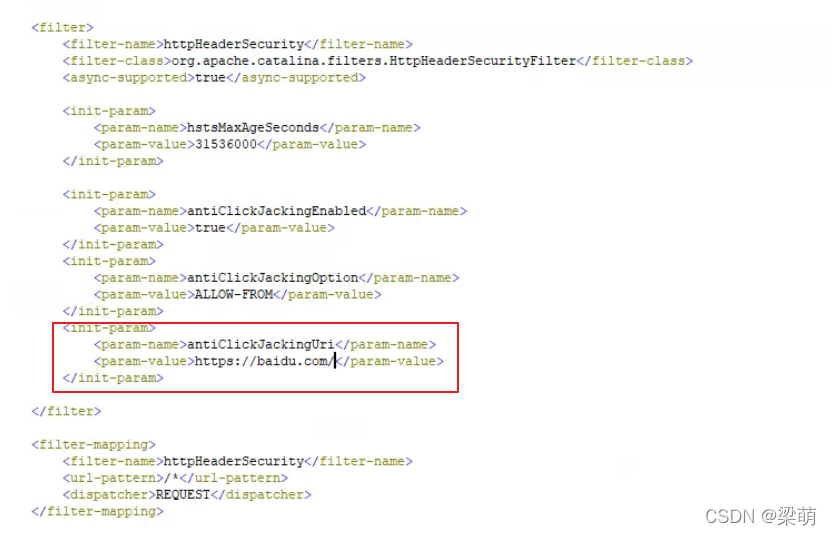 ``` <init-param> <param-name>antiClickJackingEnabled</param-name> <param-value>true</param-value> </init-param> <init-param> <param-name>antiClickJackingOption</param-name> <param-value>ALLOW-FROM</param-value> </init-param> <init-param> <param-name>antiClickJackingUri</param-name> <param-value>https://baidu.com/</param-value> ``` #Lighttpd 中配置 HSTS 将下述配置增加到你的 Lighttpd 配置文件(例如:/etc/lighttpd/lighttpd.conf): ``` server.modules += ( "mod_setenv" ) $HTTP["scheme"] == "https" { setenv.add-response-header = ( "Strict-Transport-Security" => "max-age=63072000; includeSubdomains; preload") ``` #通用配置 HSTS 方法 如果你的是虚拟主机,不想或者不会修改配置文件,那么将以下代码添加到网站根目录 index.php 中即可: ``` header("Strict-Transport-Security: max-age=63072000; includeSubdomains; preload"); ``` #HSTS preload list 提交 在《关于 HSTS 安全协议的全面详细解析》一文中就已经介绍了 HSTS,主要是为了解决 HTTP 请求 301/302 跳转到 HTTPS 这个过程可能被劫持的情况,而实际上就算加上 HSTS 响应头,用户请求的前半程依然是 HTTP 协议,所以这个时候我们就需要 HSTS preload list 了。 HSTS preload list 简单的说其实就是一个清单列表,将支持 HSTS 的网站全部加入一个 Preload 的列表,而支持 HSTS 协议的浏览器请求网站前会查询当前网站是否在这个列表中,如果是那么直接转换为 HTTPS 请求!从而解决前半程为 HTTP 的问题。这样说应该能理解咯 前面我已经分享了配置启用 HSTS 的几种方法和不同的服务器环境,那么下面我据需分享一下关于如何提交到 Preload 列表。 HSTS preload list 提交地址: https://hstspreload.org/ (可能需要免费科学上网方法) 提示:从提交到批准,网站必须强制 301 跳转到 HTTPS,否则无法通过。完成审核后可取消 301 跳转。 审核时间不等,又快有慢,直到支持的浏览器完全生效可能更需要一些时间。所以如果提交了,几乎也就不用管了。 注意:加入 Preload 列表中的网站是不能轻易撤销的,域名可以删除,但是可能需要几个月甚至更长的时间才能通过 Chrome 更新来覆盖用户,而其它浏览器就更不确定了。 所以不要轻易的加入 HSTS preload list ,除非你可以确定整个网站可以长期支持 HTTPS。不然哪天你取消 SSL 证书后,用户浏览器依然通过 HTTPS 协议访问就不好了,当然你依然可以做 301 跳转。所以如果只是玩玩,我建议大家还是算了吧! 写在最后 从配置启用 HSTS,到提交 HSTS preload list ,我自认为还是写得比较详细了,只是最后大家要提交 HSTS preload list 就需要确定一下自己的网站是否能够长期保证使用 HTTPS 协议,否则可能带来不必要的问题。 整理参考 https://blog.csdn.net/qq_15563139/article/details/82904589 https://blog.ccswust.org/2622.html https://blog.51cto.com/wemux/5574914 https://blog.csdn.net/liangmengbk/article/details/124280913 标签: ssl, HSTS 本作品采用 知识共享署名-相同方式共享 4.0 国际许可协议 进行许可。