如何启用 Certificate Transparency 2025-05-20 网络安全 暂无评论 1122 次阅读 #简单认识 Certificate Transparency 根据维基百科的解释,Certificate Transparency (CT) 目前是一项实验性的 IETF 开放标准以及开放源代码的框架,用于监控以及审计数字证书。通过证书日志、监控以及审计系统,将允许网站用户以及域名所有者来判断辨别错误或者恶意签发的证书,并且可以找出那些流氓的 CA。 翻译自维基百科:https://en.wikipedia.org/wiki/Certificate_Transparency 更多参考:What is Certificate Transparency? https://www.certificate-transparency.org/what-is-ct #Certificate Transparency 的用途 Certificate Transparency 看上去很高端是不是,我相信你也没搞清楚这个证书透明度是做什么的,通过下面这个真实的例子我来给你简单讲述一下。 在我们访问一个 https 网站的时候,这些网站都会有一个 SSL 证书,来证明这个网站就是你要访问的这个网站,并且证明网站的数据在传输过程中并没有遭到篡改。相信大家都有过被运营商进行流量挟持,被运营商在你所想要访问的页面上插广告的经历,这是因为,http 协议并不是加密的,数据在传输过程中遭到了中间设备的挟持。而 https 可以解决这个问题,因为数据的传输过程是加密的,如果运营商想要进行挟持的话,他必须有一张受浏览器信任的证书,但是这个证书他们基本上是无法获得的。 对于我们普通站长所得到的证书来说,他是由 CA (证书颁发机构) 一层一层发下来的。 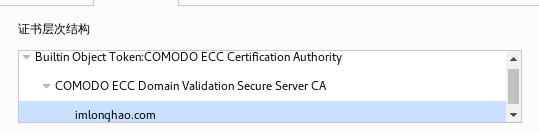 以本站为例,本站的证书是由 COMODO ECC Certification Authority 签发给 COMODO ECC Domain Validation Secure Server CA 最后再签发给我 imlonghao.com 而 COMODO ECC Certification Authority ,则是由 AddTrust External CA Root 签发,AddTrust External CA Root 是默认安装在我们的电脑或者浏览器之中,起到根证书的作用。 由我们电脑中位于信任区的根证书签发下来的证书,包括这些证书再签发下去的证书,在没有专门被 revoke 的情况下,都是会被我们的系统所信任的。 我们来看这样一条新闻:Improved Digital Certificate Security https://googleonlinesecurity.blogspot.hk/2015/09/improved-digital-certificate-security.html 这条新闻就告诉了我们 Certificate Transparency 的功用 我们先来看一看谷歌的证书链 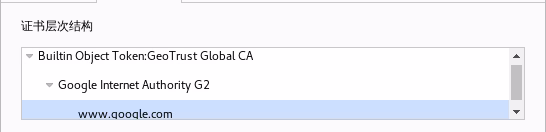 由 GeoTrust Global CA 签发给 Google Internet Authority G2 然后给签发下去到具体的域名 而上述新闻当中,Symantec’s Thawte-branded CA 就错误地为 google.com 以及 www.google.com 签发了证书,这是相当危险的,万一有人拿到了私钥,就可以到处冒充谷歌了。 根据后面 Symantec 方面所作出的解释,证书是在内部测试流程中签发的,并且证书的有效期只有一天,而且证书并没有流出到公众,也没有对用户造成影响。 那么,谷歌是怎么知道 Symantec 签发了一个他们的证书呢?难道是 Symantec 公司有内鬼呢? 根据谷歌的通告,他们是通过 Certificate Transparency 的日志发现了这个证书。 引用 Jerry Qu 对 Certificate Transparency 的解释 > Certificate Transparency 的目标是提供一个开放的审计和监控系统,可以让任何域名所有者或者 CA 确定证书是否被错误签发或者被恶意使用,从而提高 HTTPS 网站的安全性。 #如何启用 Certificate Transparency - X509v3 Certificate Extension - TLS Extension - OCSP Stapling 关于三种方式的差异,请参考文末的参考资料。 #Nginx 通过 TLS 拓展启用 Certificate Transparency 通过 TLS Extension 启用 Certificate Transparency 是一种比较通用的方式,无论你用的是哪一个 CA 签发下来的证书,都可以通过这种方式来启用 Certificate Transparency #提交证书并获取 SCT 文件 正如我们前面所说的,我们需要提交自己的证书到 CT Log 服务器中。这里我们用到了一个 GO 语言写的工具:ct-submit https://github.com/grahamedgecombe/ct-submit 通过下面的命令即可安装编译 ``` apt-get install golang git git clone https://github.com/grahamedgecombe/ct-submit cd ct-submit go build ``` 提交的命令大概如下 ``` ./ct-submit [log服务器] < [你的证书位置] > [sct文件保存位置] ``` 需要讲一下的是,上面 [你的证书位置] 所指的是完整的证书链 例子 ``` ./ct-submit ct.googleapis.com/aviator < /var/ssl/chained.pem > /var/scts/aviator.sct ``` Log 服务器列表可以在这里找到:Known Logs - Certificate Transparency https://imququ.com/post/certificate-transparency.html 部分证书不能提交到部分的 Log 服务器中,谷歌官方的几个是可以的。 #编译 Nginx 的 nginx-ct 模块 为了让我们的 Nginx 支持 Certificate Transparency,我们就必须编译 nginx-ct 这个模块了 nginx-ct 对 OpenSSL 的版本有要求,要求必须是 - OpenSSL 1.0.2 or above. - BoringSSL 4fac72e or above. 我们使用打过 CloudFlare 补丁的 OpenSSL 1.0.2 stable 安装一些编译所需要的库 ``` apt-get install libpcre3 libpcre3-dev openssl libssl-dev unzip build-essential zlib1g-dev ``` 准备好打过 CloudFlare 补丁的 OpenSSL 1.0.2 stable ``` git clone https://github.com/cloudflare/sslconfig wget -O openssl.zip -c https://github.com/openssl/openssl/archive/OpenSSL_1_0_2-stable.zip unzip openssl.zip mv openssl-OpenSSL_1_0_2-stable/ openssl cd openssl && patch -p1 < ../sslconfig/patches/openssl__chacha20_poly1305_cf.patch && cd .. ``` 准备编译 Nginx 以及 nginx-ct,截至目前 Nginx 1.9.11 并不是稳定版,所以请自行选择您的 Nginx 版本 ``` wget -c http://nginx.org/download/nginx-1.9.11.tar.gz tar zxf nginx-1.9.11.tar.gz wget -O nginx-ct.zip -c https://github.com/grahamedgecombe/nginx-ct/archive/v1.0.0.zip unzip nginx-ct.zip cd nginx-1.9.11/ ``` Nginx 编译参数,注意我们要加上我们的 nginx-ct 模块,以及指定我们所使用的 OpenSSL,编译参数我所使用的是官方 mainline 源安装中的 nginx 通过 nginx -V 所得到的参数,并未作过多修改。 ``` ./configure --prefix=/etc/nginx --sbin-path=/usr/sbin/nginx --modules-path=%{_libdir}/nginx/modules --conf-path=/etc/nginx/nginx.conf --error-log-path=/var/log/nginx/error.log --http-log-path=/var/log/nginx/access.log --pid-path=/var/run/nginx.pid --lock-path=/var/run/nginx.lock --http-client-body-temp-path=/var/cache/nginx/client_temp --http-proxy-temp-path=/var/cache/nginx/proxy_temp --http-fastcgi-temp-path=/var/cache/nginx/fastcgi_temp --http-uwsgi-temp-path=/var/cache/nginx/uwsgi_temp --http-scgi-temp-path=/var/cache/nginx/scgi_temp --user=nginx --group=nginx --with-http_ssl_module --with-http_realip_module --with-http_addition_module --with-http_sub_module --with-http_dav_module --with-http_flv_module --with-http_mp4_module --with-http_gunzip_module --with-http_gzip_static_module --with-http_random_index_module --with-http_secure_link_module --with-http_stub_status_module --with-http_auth_request_module --with-threads --with-stream --with-stream_ssl_module --with-http_slice_module --with-mail --with-mail_ssl_module --with-file-aio --with-http_v2_module --with-cc-opt='-g -O2 -fstack-protector --param=ssp-buffer-size=4 -Wformat -Werror=format-security -Wp,-D_FORTIFY_SOURCE=2' --with-ld-opt='-Wl,-Bsymbolic-functions -Wl,-z,relro -Wl,--as-needed' --with-ipv6 --add-module=../nginx-ct-1.0.0 --with-openssl=../openssl ``` 开始编译安装 ``` make && make install ``` 贴一份我所使用的 `/etc/init.d/nginx` 文件 ``` #!/bin/sh ### BEGIN INIT INFO # Provides: nginx # Required-Start: $network $remote_fs $local_fs # Required-Stop: $network $remote_fs $local_fs # Default-Start: 2 3 4 5 # Default-Stop: 0 1 6 # Short-Description: Stop/start nginx ### END INIT INFO # Author: Sergey Budnevitch <sb@nginx.com> PATH=/sbin:/usr/sbin:/bin:/usr/bin if [ -L $0 ]; then SCRIPTNAME=`/bin/readlink -f $0` else SCRIPTNAME=$0 fi sysconfig=`/usr/bin/basename $SCRIPTNAME` [ -r /etc/default/$sysconfig ] && . /etc/default/$sysconfig DESC=${DESC-nginx} NAME=${NAME-nginx} CONFFILE=${CONFFILE-/etc/nginx/nginx.conf} DAEMON=${DAEMON-/usr/sbin/nginx} PIDFILE=${PIDFILE-/var/run/nginx.pid} SLEEPSEC=1 UPGRADEWAITLOOPS=5 [ -x $DAEMON ] || exit 0 DAEMON_ARGS="-c $CONFFILE $DAEMON_ARGS" . /lib/init/vars.sh . /lib/lsb/init-functions do_start() { start-stop-daemon --start --quiet --pidfile $PIDFILE --exec $DAEMON -- \ $DAEMON_ARGS RETVAL="$?" return "$RETVAL" } do_stop() { # Return # 0 if daemon has been stopped # 1 if daemon was already stopped # 2 if daemon could not be stopped # other if a failure occurred start-stop-daemon --stop --quiet --oknodo --retry=TERM/30/KILL/5 --pidfile $PIDFILE RETVAL="$?" rm -f $PIDFILE return "$RETVAL" } do_reload() { # start-stop-daemon --stop --signal HUP --quiet --pidfile $PIDFILE RETVAL="$?" return "$RETVAL" } do_configtest() { if [ "$#" -ne 0 ]; then case "$1" in -q) FLAG=$1 ;; *) ;; esac shift fi $DAEMON -t $FLAG -c $CONFFILE RETVAL="$?" return $RETVAL } do_upgrade() { OLDBINPIDFILE=$PIDFILE.oldbin do_configtest -q || return 6 start-stop-daemon --stop --signal USR2 --quiet --pidfile $PIDFILE RETVAL="$?" for i in `/usr/bin/seq $UPGRADEWAITLOOPS`; do sleep $SLEEPSEC if [ -f $OLDBINPIDFILE -a -f $PIDFILE ]; then start-stop-daemon --stop --signal QUIT --quiet --pidfile $OLDBINPIDFILE RETVAL="$?" return fi done echo $"Upgrade failed!" RETVAL=1 return $RETVAL } case "$1" in start) [ "$VERBOSE" != no ] && log_daemon_msg "Starting $DESC " "$NAME" do_start case "$?" in 0|1) [ "$VERBOSE" != no ] && log_end_msg 0 ;; 2) [ "$VERBOSE" != no ] && log_end_msg 1 ;; esac ;; stop) [ "$VERBOSE" != no ] && log_daemon_msg "Stopping $DESC" "$NAME" do_stop case "$?" in 0|1) [ "$VERBOSE" != no ] && log_end_msg 0 ;; 2) [ "$VERBOSE" != no ] && log_end_msg 1 ;; esac ;; status) status_of_proc -p "$PIDFILE" "$DAEMON" "$NAME" && exit 0 || exit $? ;; configtest) do_configtest ;; upgrade) do_upgrade ;; reload|force-reload) log_daemon_msg "Reloading $DESC" "$NAME" do_reload log_end_msg $? ;; restart|force-reload) log_daemon_msg "Restarting $DESC" "$NAME" do_configtest -q || exit $RETVAL do_stop case "$?" in 0|1) do_start case "$?" in 0) log_end_msg 0 ;; 1) log_end_msg 1 ;; # Old process is still running *) log_end_msg 1 ;; # Failed to start esac ;; *) # Failed to stop log_end_msg 1 ;; esac ;; *) echo "Usage: $SCRIPTNAME {start|stop|status|restart|reload|force-reload|upgrade|configtest}" >&2 exit 3 ;; esac exit $RETVAL ``` 杂项(依照的是我的 nginx.conf ) ``` chmod +x /etc/init.d/nginx mkdir -p /var/cache/nginx/client_temp mkdir /etc/nginx/conf.d /usr/sbin/update-rc.d -f nginx defaults ``` #修改 nginx 配置启用 ct ssl_ct_static_scts 指向的是存放我们 sct 文件的文件夹,因为 sct 文件可能有很多个… 将下列两行加上到你站点的配置文件即可,具体参数具体而定。 ``` ssl_ct on; ssl_ct_static_scts /var/scts; ``` 最后重启一下你的 Nginx,应该就是大功告成的了。  参考资料 Certificate Transparency 官方网站https://www.certificate-transparency.org/ Certificate Transparency 那些事 | JerryQu 的小站 转自https://imlonghao.com/35.html 标签: 证书 本作品采用 知识共享署名-相同方式共享 4.0 国际许可协议 进行许可。