基于Centos7+Rsyslog8.2404+LogAnalyzer4.1.13+Mysql5.7部署日志服务器 2025-01-24 网络 暂无评论 2021 次阅读 #基本部署文档 1、升级本机所有包 ``` yum update -y ``` 2、查看rsyslog官网,加入新的源`https://www.rsyslog.com/rhelcentos-rpms/` ``` cd /etc/yum.repos.d/ wget http://rpms.adiscon.com/v8-stable/rsyslog.repo # for CentOS 7,8,9 wget http://rpms.adiscon.com/v8-stable-daily/rsyslog-daily.repo # for CentOS 7,8,9 ``` 也可以通过rpm直接安装,在这里搜索包。由于用的centos7可能版本较低,需要较多依赖,未成功。最好采用其他在维护发行版。 http://rpmfind.net/linux/rpm2html/search.php?query=rsyslog 4、安装Rsyslog及Rsyslog连接MySQL的模块 ``` yum install rsyslog rsyslog-mysql -y ``` 5、导入rsyslog-mysql数据库文件 由于安装了BT面板,就直接在面板中建立数据库,注意这里的配置参数要和后面conf文件对应。 如果未通过BT面板安装,传统导入方法如下: ``` cd /usr/share/doc/rsyslog-8.24.0/ mysql -uroot -padmin@123 < mysql-createDB.sql ``` 创建用户 ``` grant all on Syslog.* to rsyslog@'localhost' identified by '123456'; flush privileges; ``` 注意导入时建立的库为Syslog首字母为大写。BT面板建立的为小写syslog。 rsyslog原始SQL [mysql-createDB.zip](https://blog.moper.net/usr/uploads/2025/01/3260376226.zip) BT面板建立SQL [syslog最终表结构.zip](https://blog.moper.net/usr/uploads/2025/01/1110351165.zip) 6、配置文件开启端口和模块 正常开启mysql例子如下 ``` $ModLoad ommysql *.* :ommysql:localhost,Syslog,rsyslog,123456 ``` 最终配置文件如下,主要开启了udp和tcp514端口获取,开启mysql输出,注意mysql连接配置。 ``` # rsyslog configuration file # For more information see /usr/share/doc/rsyslog-*/rsyslog_conf.html # If you experience problems, see http://www.rsyslog.com/doc/troubleshoot.html #### MODULES #### $MaxMessageSize 64k # The imjournal module bellow is now used as a message source instead of imuxsock. $ModLoad imuxsock # provides support for local system logging (e.g. via logger command) $ModLoad imjournal # provides access to the systemd journal #$ModLoad imklog # reads kernel messages (the same are read from journald) $ModLoad immark # provides --MARK-- message capability # Provides UDP syslog reception $ModLoad imudp $UDPServerRun 514 # Provides TCP syslog reception $ModLoad imtcp $InputTCPServerRun 514 $ModLoad ommysql *.* :ommysql:127.0.0.1,syslog,syslog,123456 #### GLOBAL DIRECTIVES #### # Where to place auxiliary files $WorkDirectory /var/lib/rsyslog # Use default timestamp format $ActionFileDefaultTemplate RSYSLOG_TraditionalFileFormat # File syncing capability is disabled by default. This feature is usually not required, # not useful and an extreme performance hit #$ActionFileEnableSync on # Include all config files in /etc/rsyslog.d/ $IncludeConfig /etc/rsyslog.d/*.conf # Turn off message reception via local log socket; # local messages are retrieved through imjournal now. $OmitLocalLogging on # File to store the position in the journal $IMJournalStateFile imjournal.state #### RULES #### # Log all kernel messages to the console. # Logging much else clutters up the screen. #kern.* /dev/console # Log anything (except mail) of level info or higher. # Don't log private authentication messages! #*.info;mail.none;authpriv.none;cron.none /var/log/rsyslog/messages # The authpriv file has restricted access. #authpriv.* /var/log/rsyslog/secure # Log all the mail messages in one place. #mail.* -/var/log/rsyslog/maillog # Log cron stuff #cron.* /var/log/rsyslog/cron # Everybody gets emergency messages #*.emerg :omusrmsg:* # Save news errors of level crit and higher in a special file. #uucp,news.crit /var/log/rsyslog/spooler # Save boot messages also to boot.log #local7.* /var/log/rsyslog/boot.log # 定义一个模板,使用设备 IP 动态生成文件路径 template(name="DynamicLogFile" type="string" string="/var/log/rsyslog/%fromhost-ip%/%$year%-%$month%-%$day%/%$HOUR%-%$MINUTE%.log") # 根据 IP 地址将日志写入动态生成的文件 if $fromhost-ip != '' then ?DynamicLogFile & stop # ### begin forwarding rule ### # The statement between the begin ... end define a SINGLE forwarding # rule. They belong together, do NOT split them. If you create multiple # forwarding rules, duplicate the whole block! # Remote Logging (we use TCP for reliable delivery) # # An on-disk queue is created for this action. If the remote host is # down, messages are spooled to disk and sent when it is up again. #$ActionQueueFileName fwdRule1 # unique name prefix for spool files #$ActionQueueMaxDiskSpace 1g # 1gb space limit (use as much as possible) #$ActionQueueSaveOnShutdown on # save messages to disk on shutdown #$ActionQueueType LinkedList # run asynchronously #$ActionResumeRetryCount -1 # infinite retries if host is down # remote host is: name/ip:port, e.g. 192.168.0.1:514, port optional #*.* @@remote-host:514 # ### end of the forwarding rule ### ``` 输出文件日志会按照来源IP进行分文件夹,每日一个文件保存。 结束后可以看一下安装版本,执行重启服务配置才会生效。 ``` rsyslogd -version systemctl restart rsyslog ``` 7、配置防火墙 作为日志服务器,需要开启访问514端口。 ``` # firewall-cmd --zone=public --add-port=514/tcp # firewall-cmd --zone=public --add-port=514/udp ``` 也可用BT面板直接开启514tcp/udp。 8、开启mysql后,遇到无法写入mysql的问题。经过查看上述文件夹/var/log/rsyslog/127.0.0.1中的日志可看到报错原因。 ``` could not load module 'ommysql', errors: trying to load module /usr/lib64/rsyslog/ommysql.so: /usr/lib64/libmysqlclient.so.18: version `libmysqlclient_18' not found (required by /usr/lib64/rsyslog/ommysql.so) [v8.2404.0 try https://www.rsyslog.com/e/2066 ] ``` 报错原因查了一圈,首先确定不是ommysql.so问题。可运行'rpm -ql rsyslog-mysql',查看rsyslog-mysql安装生成了那些文件,`/usr/lib64/rsyslog/ommysql.so`目录与上面一致。 后又查看`libmysqlclient.so.18`,发现被软连接到BT面板自带的`/www/server/mysql/lib/libmysqlclient.so.20`。报错应该是提示version不对。 通过`yum install mariadb-libs-5.5.68-1.el7.x86_64`安装,`rpm -ql mariadb-libs-5.5.68-1.el7.x86_64`可以查询到`/user/lib64/mysql/libmysqlclient.so.18`。 做一个软连接即可`/user/lib64/libmysqlclient.so.18->/user/lib64/mysql/libmysqlclient.so.18` 如果找不到`libmysqlclient.so.18`也可以试一下下面命令: ``` yum install mysql-devel yum install mysql-community-libs wget https://mirrors.aliyun.com/mysql/MySQL-5.7/mysql-community-libs-compat-5.7.36-1.el7.x86_64.rpm ``` #如何配置客户端? ##Linux服务器 ① 安装Rsyslog,如果需要换源,可参照上面。 ``` yum install rsyslog -y ``` ② 配置日志发送 ``` vi /etc/rsyslog.conf ``` 编辑rsyslog服务配置文件,文件末尾加入一行 ``` #*.* info @172.16.5.166:514 *.* @@172.16.5.166:514 ``` 保存退出。认证和计划任务日志等在本地保存的同时,还会保存到远程日志服务器。 配置术语说明:facility:中文翻译过来是设施的意思,从功能或程序上对日志分类,在Linux中常见的facility有:auth(认证相关的日志),authpriv(授权相关的日志),cron(计划任务相关日志),daemon(系统服务相关日志),ftp(ftp服务相关的日志),kern(内核相关日志),lpr(打印相关的日志),mail(邮件相关日志),news(新闻相关的日志),security(安全相关的日志),user(用户相关的日志),uucp(文件copy相关的日志),local0-local7(自定义相关的日志) priority:优先级别,从低到高排序:debug(调试),info(消息),notice(注意),warn(warning警告),err(error错误),crit(critical严重警告),alert(需要立即修改的信息)emerg(panic内核崩溃,内核恐慌等严重的信息) 一个@代表通过UDP协议发送日志,两个@@代表以tcp方式传送日志。与UDP相比,TCP传输的方式更加稳定一些。 ③ 将客户端执行的所有命令写入系统日志中 编辑/etc/bashrc ``` vi /etc/bashrc ``` 文件底部添加一行,加入以下内容 ``` export PROMPT_COMMAND='{ msg=$(history 1 | { read x y; echo $y; });logger "[euid=$(whoami)]":$(who am i):[`pwd`]"$msg"; }' ``` 设置使其生效 ``` source !$ ``` ④重启服务,使配置更改生效 ``` systemctl restart rsyslog ``` ##Windows服务器 下载Rsyslog Windows版本 访问 https://www.rsyslog.com/windows-agent/windows-agent-download/ 并下载最新的Rsyslog MSI安装程序。 方法一: 打开RSyslog Windows Agent Configuration,依次展示RuleSets--->Default RuleSet--->ForwardSyslog--->Actions--->Rsyslog,进行Rsyslog转发配置,并启用服务。 方法二: 打开Rsyslog配置文件 rsyslog.conf,通常位于 D:\Program Files\rsyslog\ 目录下。 例如,如果您想将日志发送到远程的Rsyslog服务器,您可以在配置文件中添加如下行: ``` *.* @@172.16.5.166:514 ``` 其中172.16.5.166是Rsyslog服务器的IP地址,514 是默认的Rsyslog端口。 重启Rsyslog服务 可以通过服务管理器(services.msc)来重启Rsyslog服务,或者使用命令行: ``` net stop rsyslog && net start rsyslog ``` ##交换机和防火墙等设备 Huawei ``` <Huawei> system-view [Huawei] info-center loghost source Vlanif144 [Huawei] info-center loghost 172.16.5.166 facility local5 ``` H3C ``` <H3C> system-view [H3C] info-center enable [H3C] info-center loghost source Vlan-interface144 [H3C] info-center loghost 172.16.5.166 facility local6 ``` Cisco ``` Cisco> Cisco> enable Cisco# config terminal Cisco(config)# logging on Cisco(config)# logging 172.16.5.166 Cisco(config)# logging facility local4 Cisco(config)# logging source-interface e0 ``` Ruijie ``` Ruijie> Ruijie> enable Ruijie# config terminal Ruijie(config)# logging buffered warnings Ruijie(config)# logging source interface VLAN 144 Ruijie(config)# logging facility local6 Ruijie(config)# logging server 172.16.5.166 ``` #附录: 官方文档中mysql模版 RSYSLOG_StdDBFmt - Generates a insert command with the message properties, into table SystemEvents for a MariaDB/MySQL database. ``` template(name="StdSQLformat" type="list" option.sql="on") { constant(value="insert into SystemEvents (Message, Facility, FromHost, Priority, DeviceReportedTime, ReceivedAt, InfoUnitID, SysLogTag)") constant(value=" values ('") property(name="msg") constant(value="', ") property(name="syslogfacility") constant(value=", '") property(name="hostname") constant(value="', ") property(name="syslogpriority") constant(value=", '") property(name="timereported" dateFormat="mysql") constant(value="', '") property(name="timegenerated" dateFormat="mysql") constant(value="', ") property(name="iut") constant(value=", '") property(name="syslogtag") constant(value="')") } ``` 其他模版 ``` template(name="stdSQLformat" type="string" option.sql="on" string="insert into SystemEvents (Message, Facility, FromHost, Priority, DeviceReportedTime, ReceivedAt, InfoUnitID, SysLogTag) values ('%msg%', %syslogfacility%, '%HOSTNAME%', %syslogpriority%, '%timereported:::date-mysql%', '%timegenerated:::date-mysql%', %iut%, '%syslogtag%')" ) ``` ``` $template tpl,"insert into SystemEvents (Message, Facility, FromHost, Priority, DeviceReportedTime, ReceivedAt, InfoUnitID, SysLogTag) values ('%msg%', %syslogfacility%, '%HOSTNAME%', %syslogpriority%, '%timereported:::date-mysql%', '%timegenerated:::date-mysql%', %iut%, '%syslogtag%')",SQL ``` ``` module(load="ommysql") action(type="ommysql" server="mysqlserver.example.com" serverport="1234" db="syslog_db" uid="user" pwd="pwd") ``` 如果要编译安装rsyslog,注意添加mysql模块 ``` ./configure --enable-mysql ``` #安装LogAnalyzer支持web查询 已经支持PHP8,在BT中建立网站,选择Nginx 1.26.2+PHP 8.0.26。建立完毕后注意去除PHP的openlog函数禁用。经测试PHP8.3也可正常使用。 1、下载程序 ``` wget https://download.adiscon.com/loganalyzer/loganalyzer-4.1.13.tar.gz ``` 解压到网站目录即可 2、提示没有配置文件,点击here下一步; 3、验证文件权限(BT面板中没遇到权限问题,以下仅供参考) 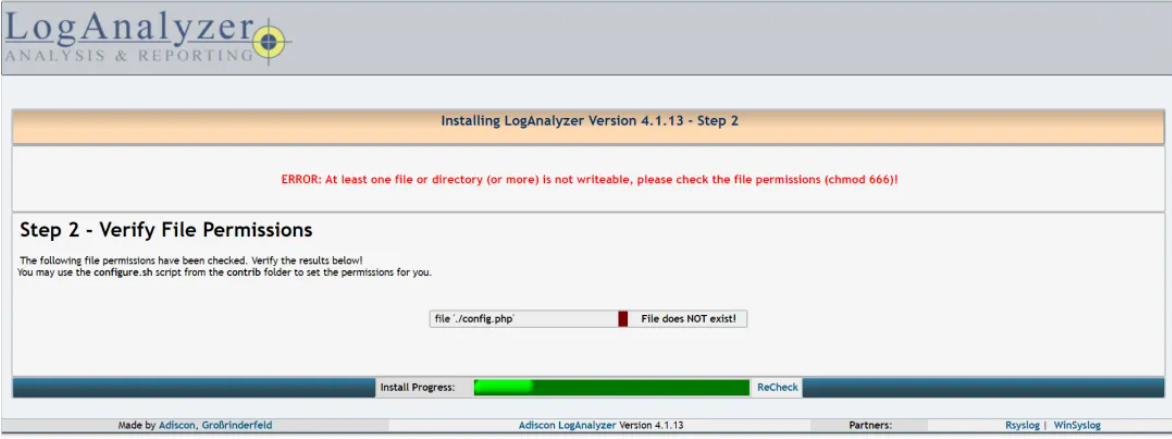 提示错误:缺少config.php文件,并且权限要设置为666,可以使用contrib目录下的configure.sh脚本生成。 查看configure.sh文件的内容 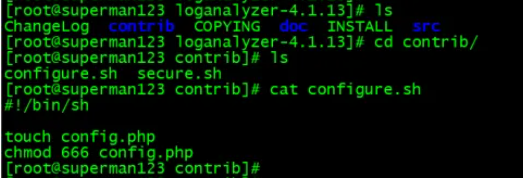 需要在/var/www/html/loganalyzer/下创建config.php文件,并设置666权限 ``` [root@superman123 contrib]# touch /var/www/html/loganalyzer/config.php [root@superman123 contrib]# chmod 666 !$ ```  操作完上面的,执行Recheck,config.php文件可写 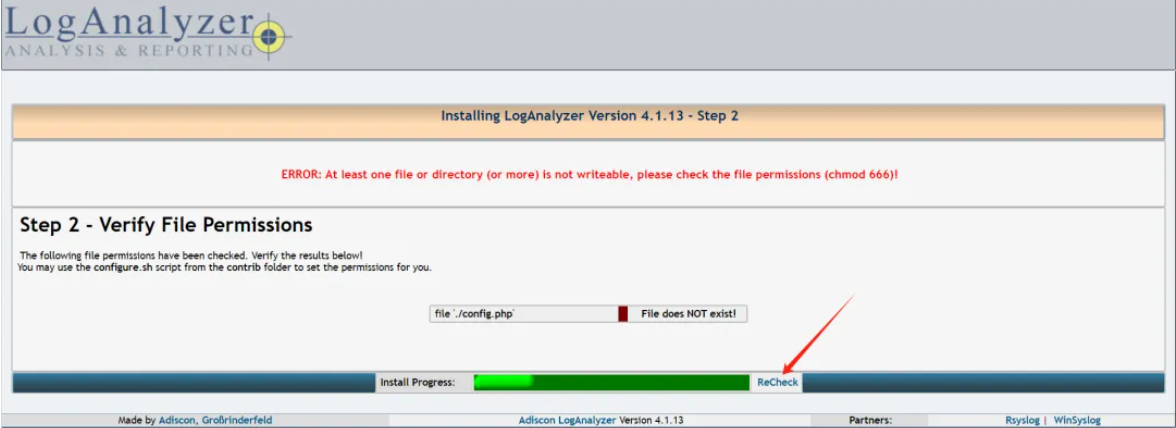 4、基础设置 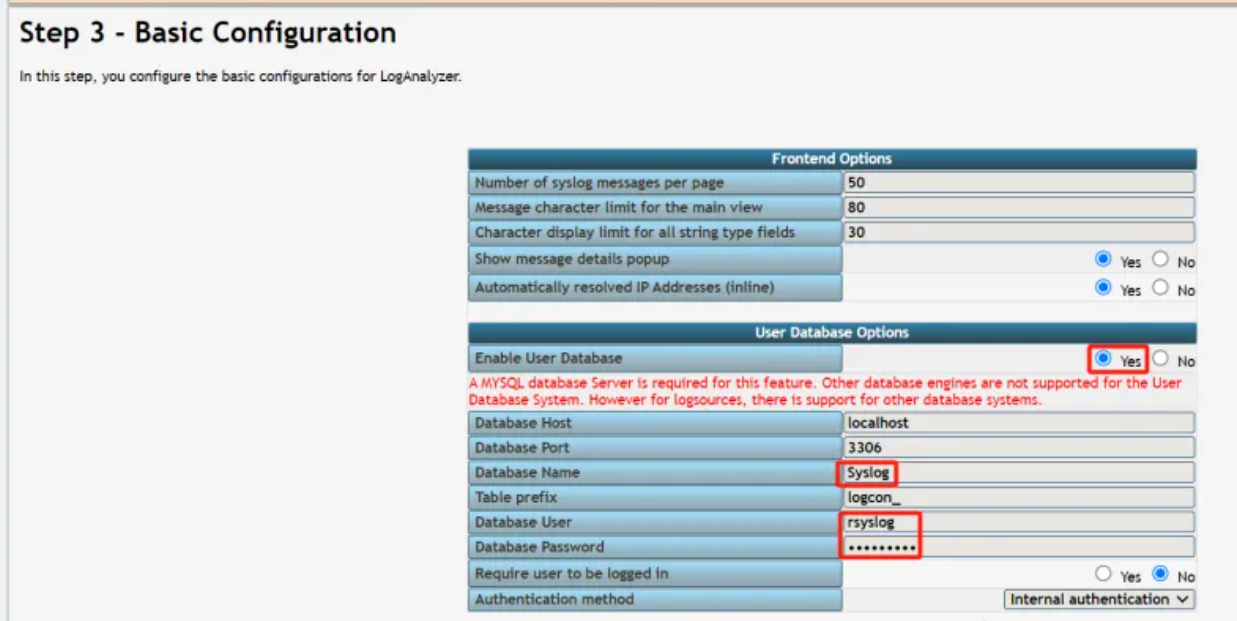 注意该项要开启,否则无须登录也可查看log。 Require User to be logged in :Yes 5、创建表、检查SQL结果、创建用户 6、创建系统日志源 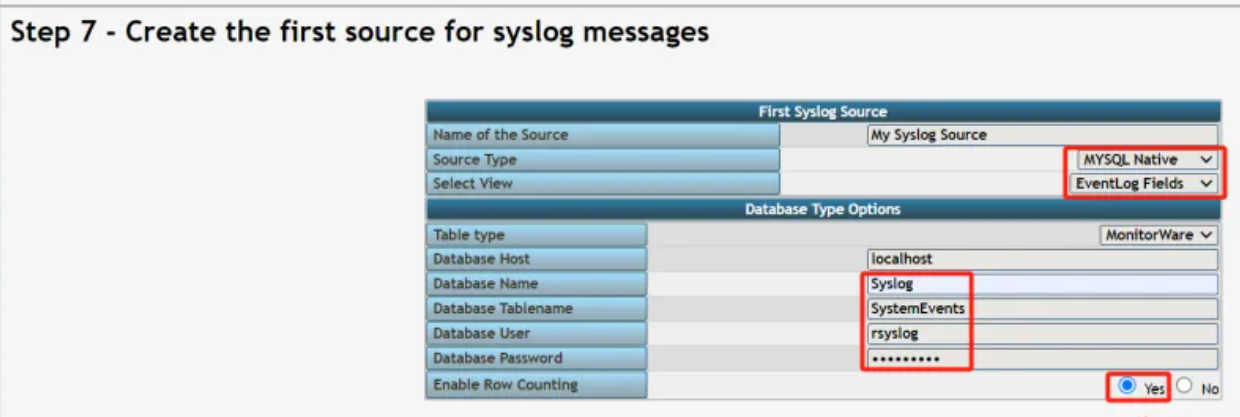 注意SystemEvents表必须为大写,和数据库中一致。 7、完成 注意如需更改配置可在loganalyzer/config.php中修改,同时如果账号和数据库连接有错,还需在数据库中同步修改。 #附录: #config文件出错问题另一解决方法记录 将安装包contrib文件夹中的两个文件拷贝至syslog网站根目录中 ``` cp -r loganalyzer-4.1.13/contrib/* /var/www/html/syslog/ ``` 将两个可执行文件增加a+x权限 ``` cd /var/www/html/syslog/ chmod +x configure.sh secure.sh ``` 运行configure.sh,会生成一个空白的config.php文件 ``` ./configure.sh ``` 访问`IP:端口/syslog`,报错点击"here",使用向导进行安装 #loganalyzer中文乱码解决方法: 备份配置文件 ``` cp /var/www/html/syslog/include/functions_common.php /home/cgyxt/syslog/ ``` 修改配置文件 ``` vim /var/www/html/syslog/include/functions_common.php ``` 找到含有return htmlentities字段的行; ``` return htmlentities($myStr, ENT_NOQUOTES, $content['HeaderDefaultEncoding']);// "UTF-8"); ``` 修改为(该项似乎有问题,可以不修改,PHP默认即为UTF-8,且下方有语法错误): ``` return htmlentities($myStr, ENT_NOQUOTES, $content['HeaderDefaultEncoding']), "UTF-8"); ``` 保存 重启apache ``` systemctl restart httpd ``` 进入loganalyzer,将Admin Center>Global Options Only>Default character encoding改为"utf-8",完成后点击send changes。 参考链接: https://mp.weixin.qq.com/s/qhyDj-0e9i-cJkLXXb1OnQ https://blog.csdn.net/N71FS1/article/details/128049058 标签: 日志, rsyslog 本作品采用 知识共享署名-相同方式共享 4.0 国际许可协议 进行许可。