vCenter6.7的管理网络使用vDS+LACP 2023-02-02 虚拟化 暂无评论 4979 次阅读 VMware虚拟化 - 建设篇 第二章 vCenter6.7的管理网络使用vDS+LACP VMware虚拟化 - 建设篇 系列文章回顾 下章内容 前言 前置条件 软件环境 硬件环境 简易拓扑说明 vCenter配置vDS(分布式交换机) 官网介绍 新建分布式交换机 配置vDS的发现协议 vDS新建LACP端口聚合组 vDS添加ESXi主机 交换机配置LACP 结果验证 新建分布式端口的注意事项 其他优化:部署模板虚拟机 命名规范 模板虚拟机初始配置 CentOS系列的推荐安装流程 参考来源 前言 由于整合了几台ESXi主机,使用了vCenter虚拟化平台并配置了vSphere群集功能,但管理网络还是使用的vSwitch及ESXi的端口组,打算给管理网络切换成vDS分布式网络的架构。 虚拟化平台:VMware VSCA 6.7.0.52000 ESXi底层:VMware VMvisor 6.7.0 U3b 前置条件 软件环境 1. ESXi要加入vCenter集中管理 2. 管理网络在加入分布式交换机之前要提前配置好分布式端口组 硬件环境 1. 每台ESXi主机的ETH0-ETH1上行链路上联到交换机,VMkernel适配器分配给Management Network 2. 交换机下联ESXi的ETH0-ETH1的接口加入Eth-Trunk口,使用LACP静态聚合模式,分配Trunk口+PVID,PVID的VLAN作为ESXi的管理网段,与内网互通。并放通PVID网段和虚拟机的业务网段 简易拓扑说明 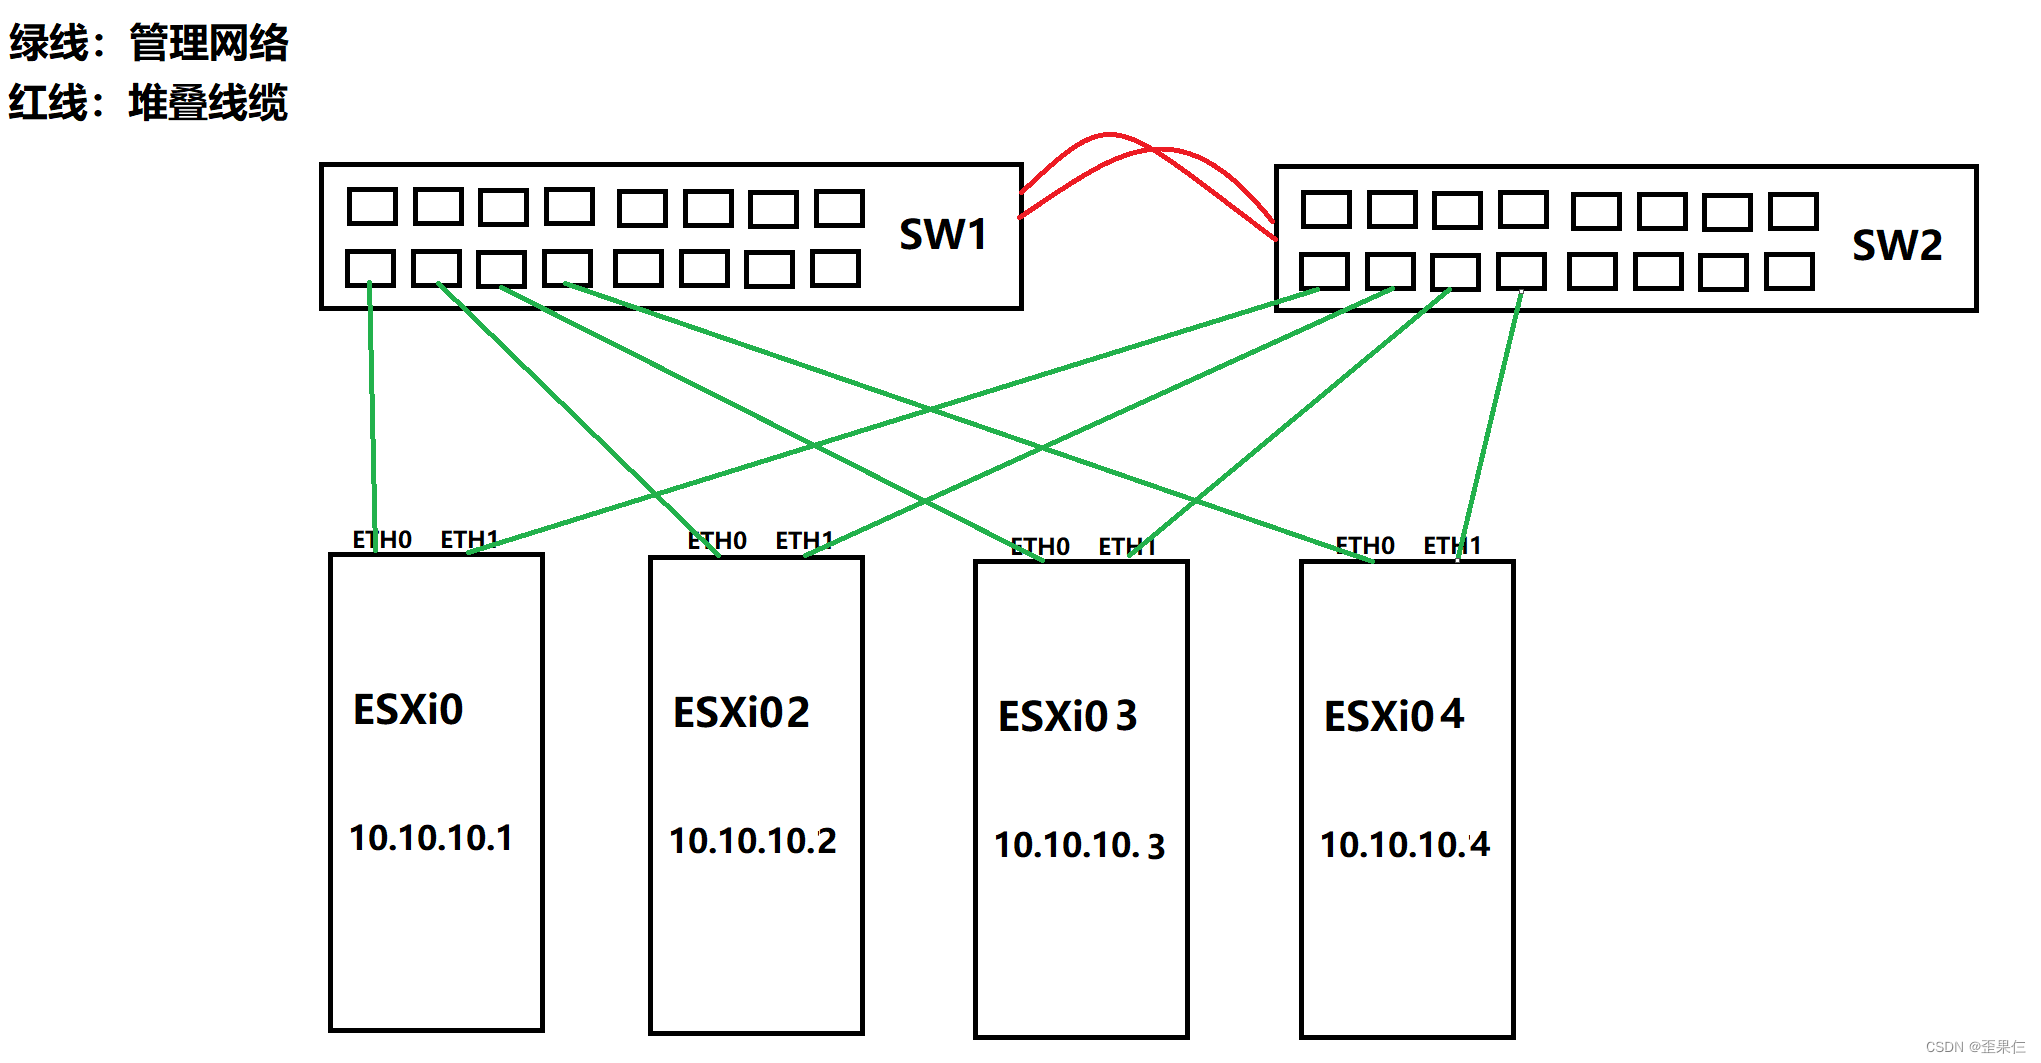 vCenter配置vDS(分布式交换机) 官网介绍 vSphere 中的网络交换机由两个逻辑部分组成:数据面板和管理面板。数据平面可实现数据包交换、筛选和标记等。管理面板是用于配置数据面板功能的控制结构。vSphere 标准交换机同时包含数据面板和管理面板,您可以单独配置和维护每个标准交换机。 vSphere Distributed Switch 的数据面板和管理面板相互分离。Distributed Switch 的管理功能驻留在 vCenter Server 系统上,您可以在数据中心级别管理环境的网络配置。数据面板则保留在与 Distributed Switch 关联的每台主机本地。Distributed Switch 的数据面板部分称为主机代理交换机。在 vCenter Server(管理面板)上创建的网络配置将被自动向下推送至所有主机代理交换机(数据面板)。 vSphere Distributed Switch 引入的两个抽象概念可用于为物理网卡、虚拟机和 VMkernel 服务创建一致的网络配置。 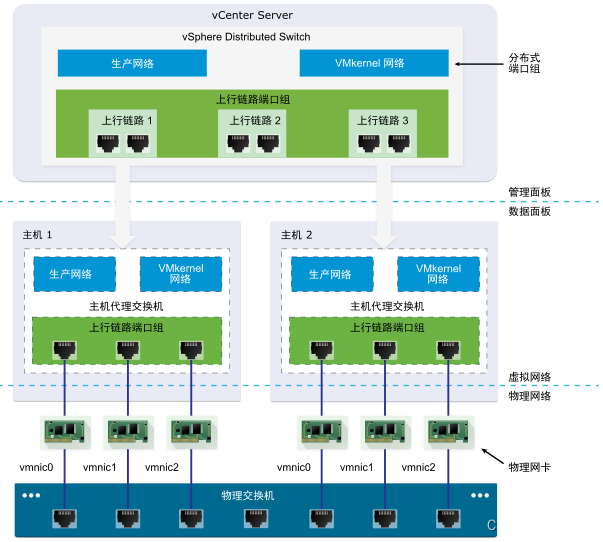 新建分布式交换机 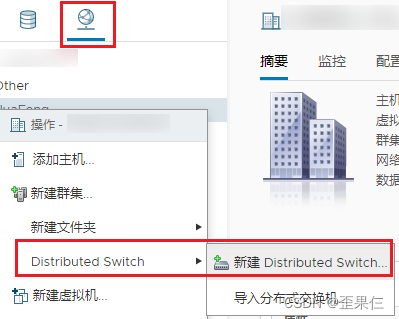 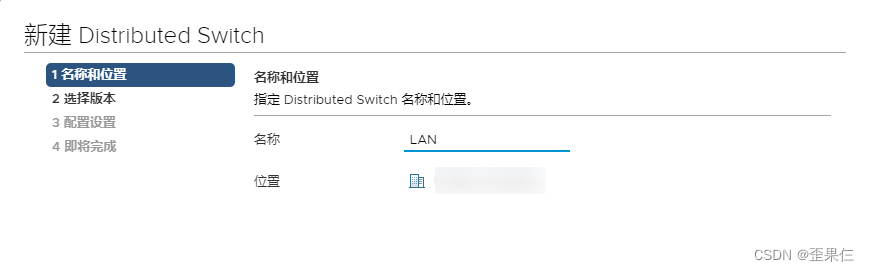 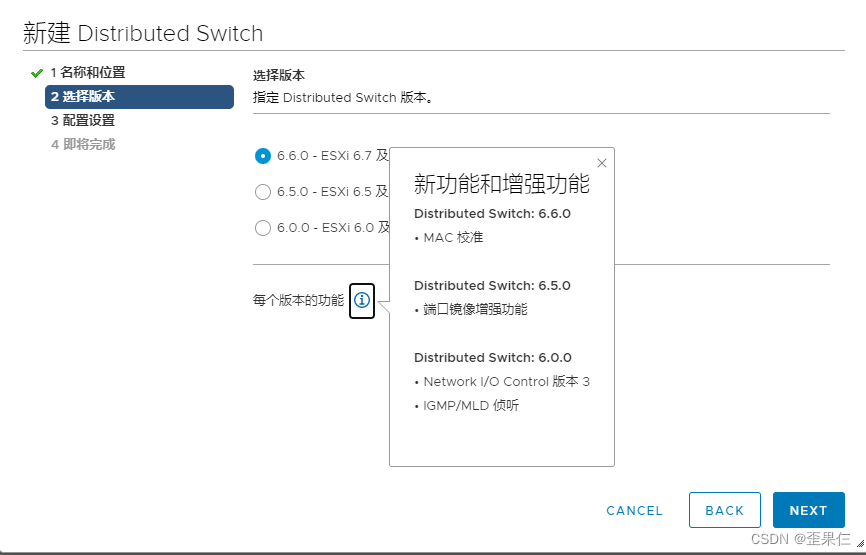 上行链路分配2条,用作vDS的LACP链路聚合 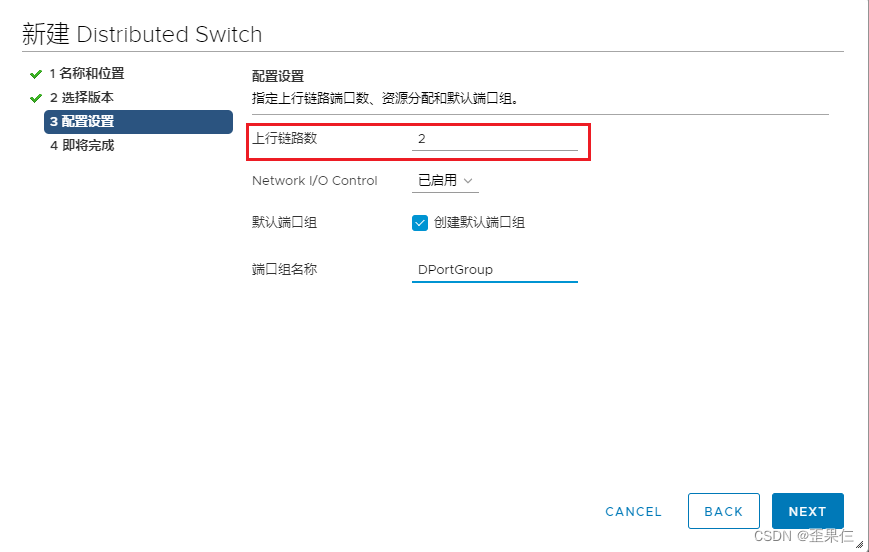 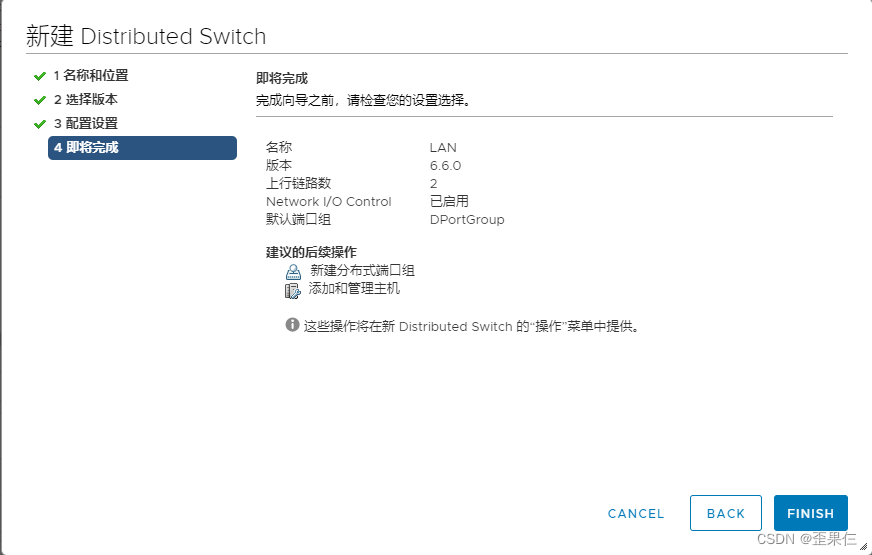 配置vDS的发现协议 启用vDS的LACP协议需要开启链路层发现协议(LDAP) 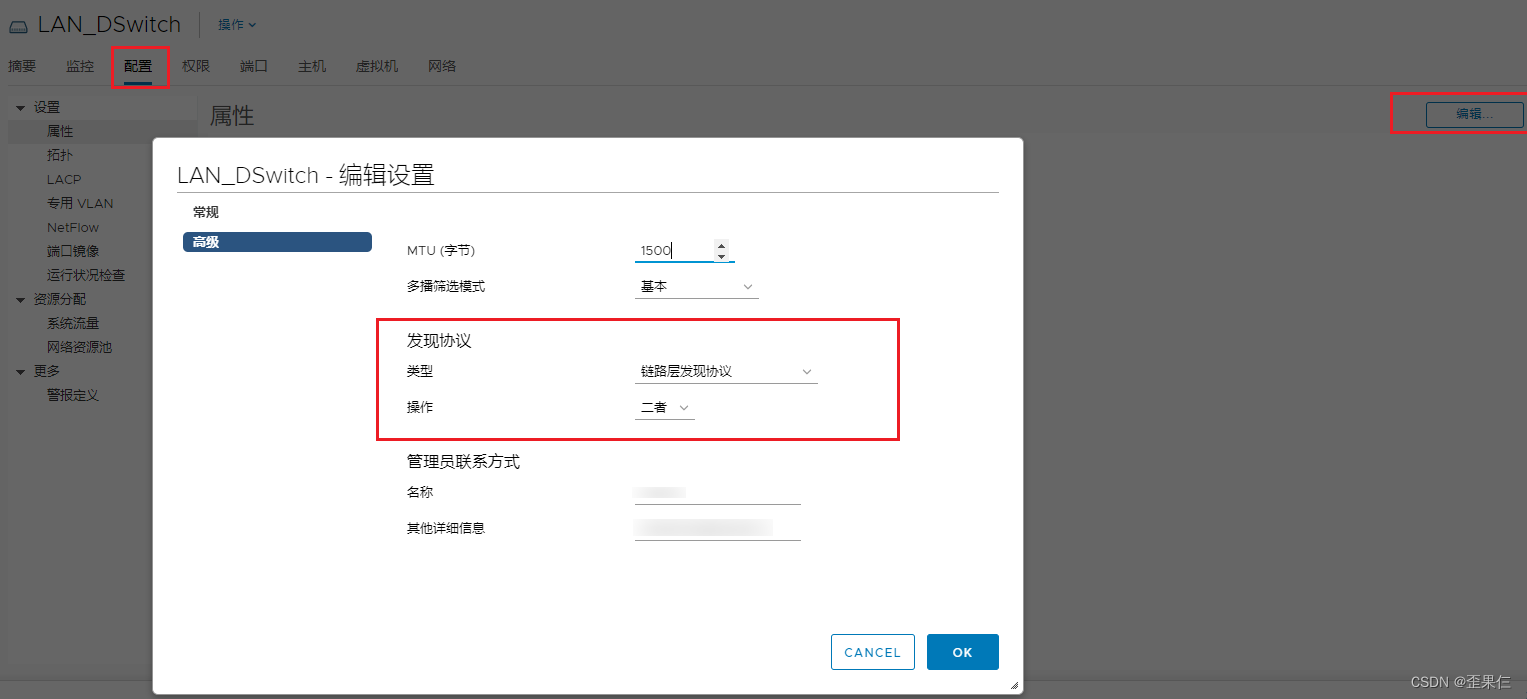  vDS新建LACP端口聚合组 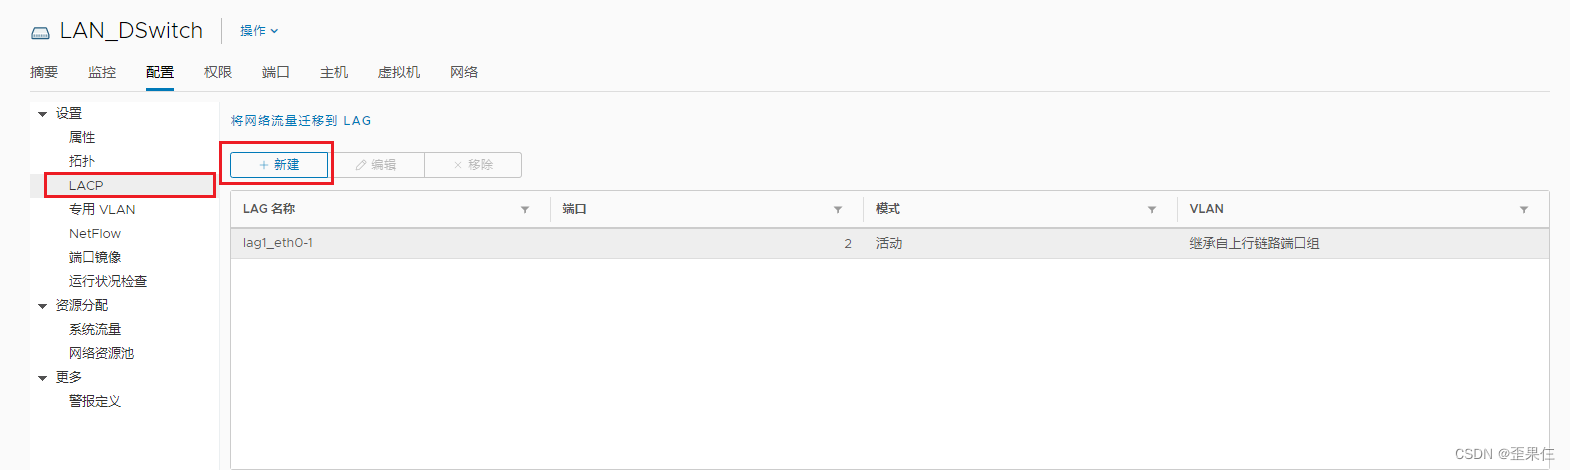 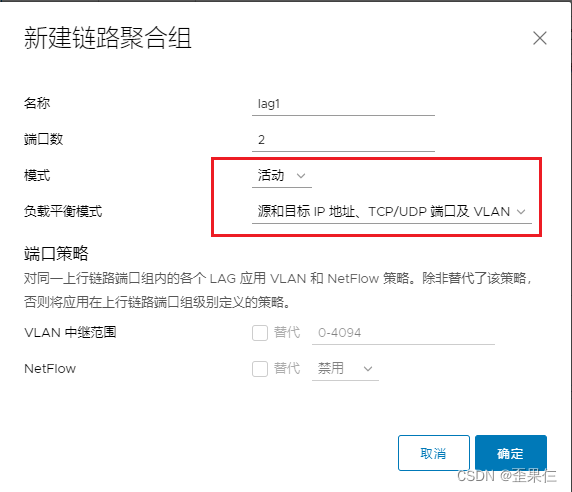 vDS添加ESXi主机 vDS添加ESXi主机步骤的原则: 1. 确保每台ESXi的2条上行链路都是先分配到活动适配器列表,VMkernel适配器都是Management Network 2. vDS添加ESXi时先添加一个网卡到vDS,确保vDS网络正常后再添加第二个网卡到vDS 3. 包含VCSA的ESXi添加到vDS的步骤需特殊处理,在添加完第一个网卡到vDS之后,必须给VCSA虚拟机的网络分配到DPortGroup(分布式端口组)之后再添加第二块网卡到vDS 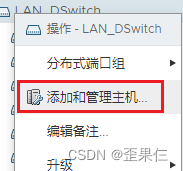 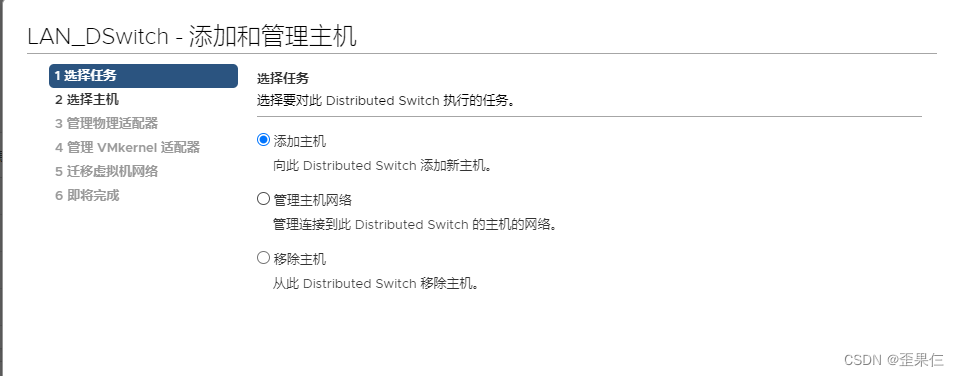 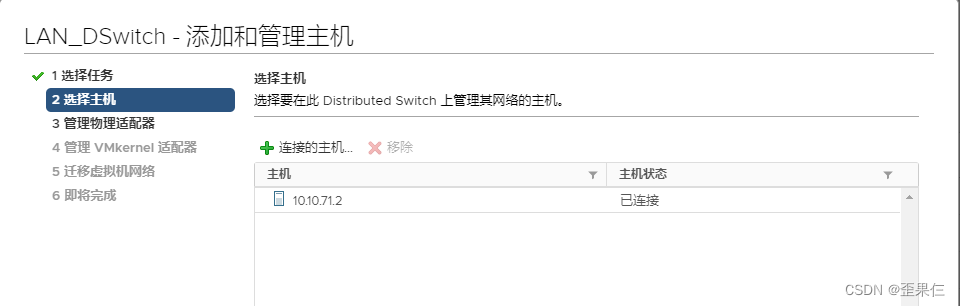 先添加ETH1网卡(vmnic1)到vDS的lag1 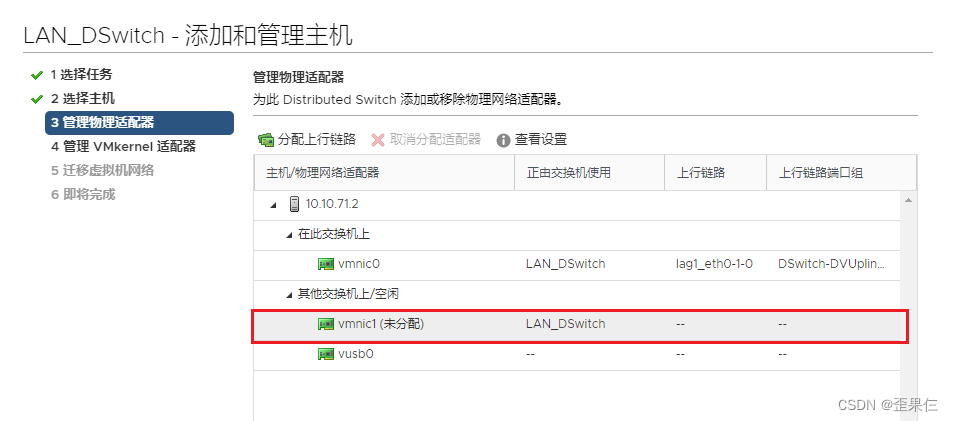 按照先后顺序来,ETH1网卡分配给lag的第2个端口 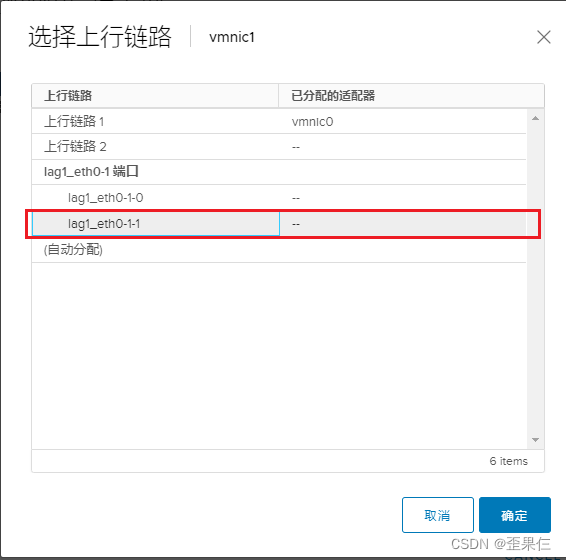 VMkernel适配器默认不迁移 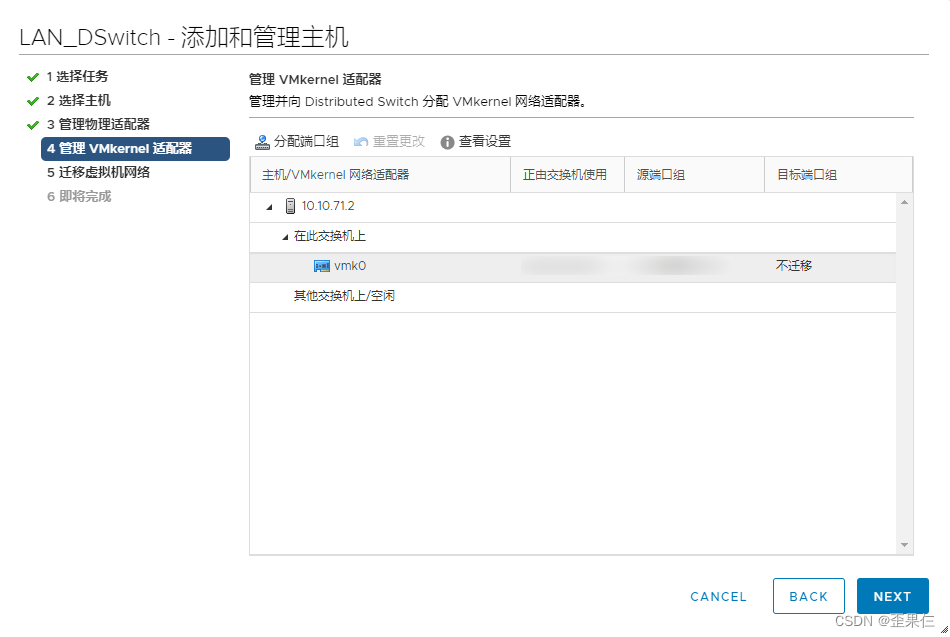 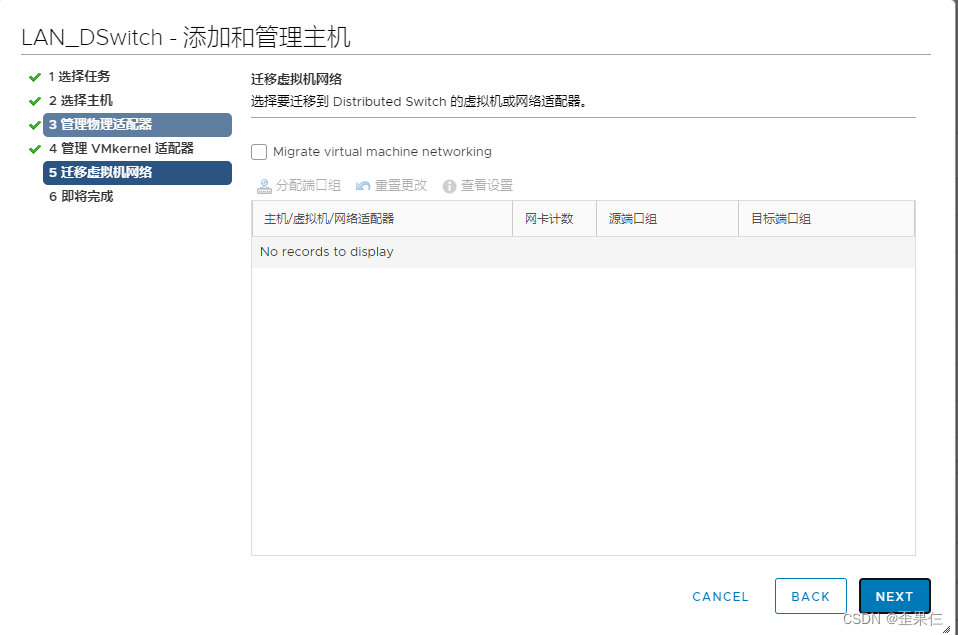 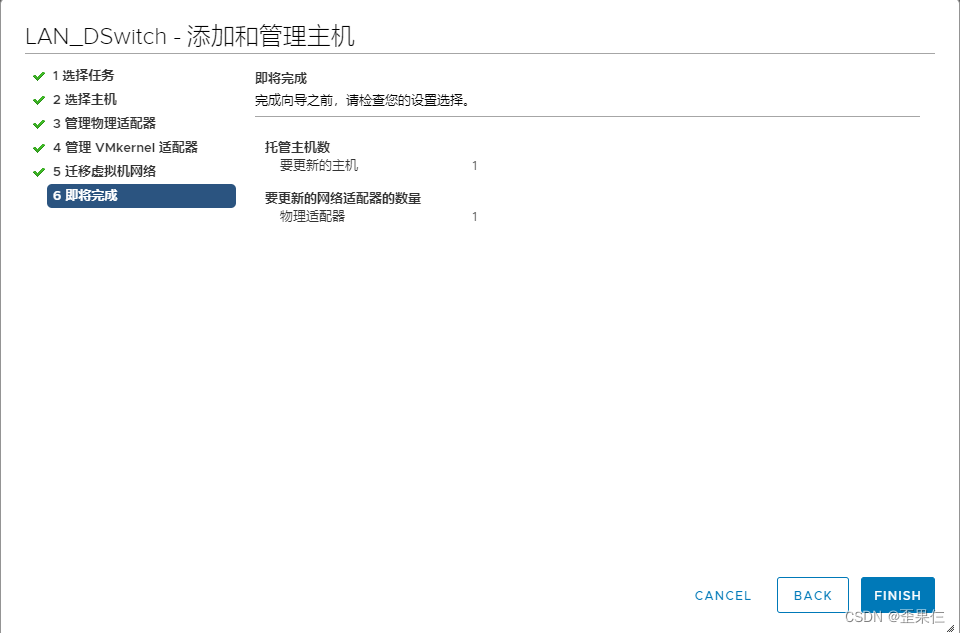 按照上述步骤,依次把ESXi主机管理网络的ETH1网卡 添加到vDS分布式交换机的LACP聚合组第2个端口。 加完ETH1网卡之后,再依次把未包含VCSA的ESXi主机的ETH0网卡 添加到vDS分布式交换机的LACP聚合第1个端口。 包含VCSA的ESXi主机ETH0网卡添加到vDS分布式交换机的LACP聚合第1个端口,要先给VCSA的网络分配到分布式端口组 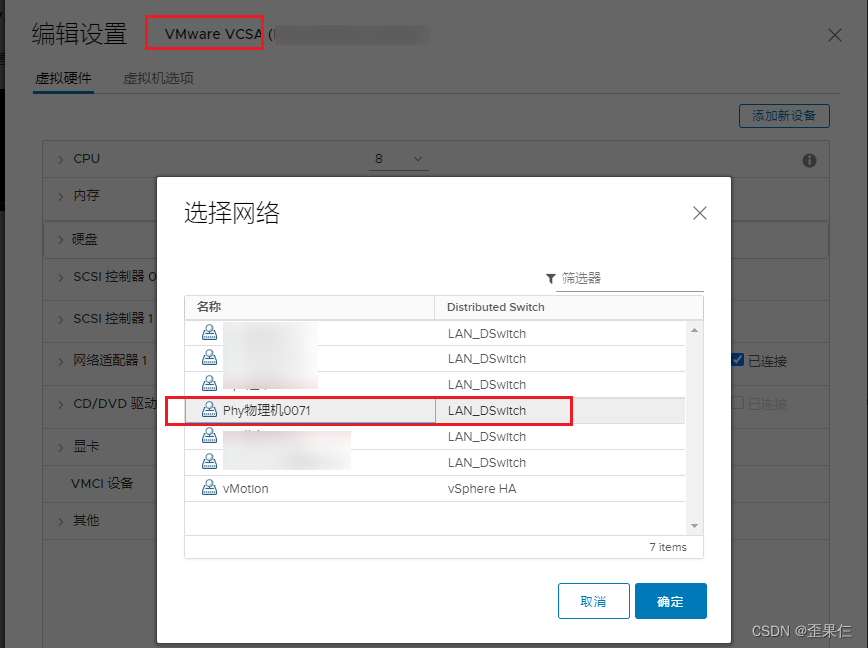 分配好分布式端口组之后再对ESXi主机的ETH0网卡添加到vDS的LACP第1个端口 交换机配置LACP 交换机下联ESXi主机的Eth-Trunk口默认是manual手工负载模式,修改成LACP模式。 ``` interface eth-trunk 1 mode lacp quit ``` 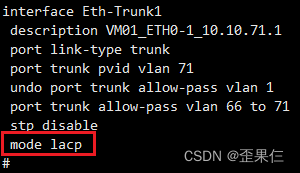 结果验证 验证管理网络的vDS配置 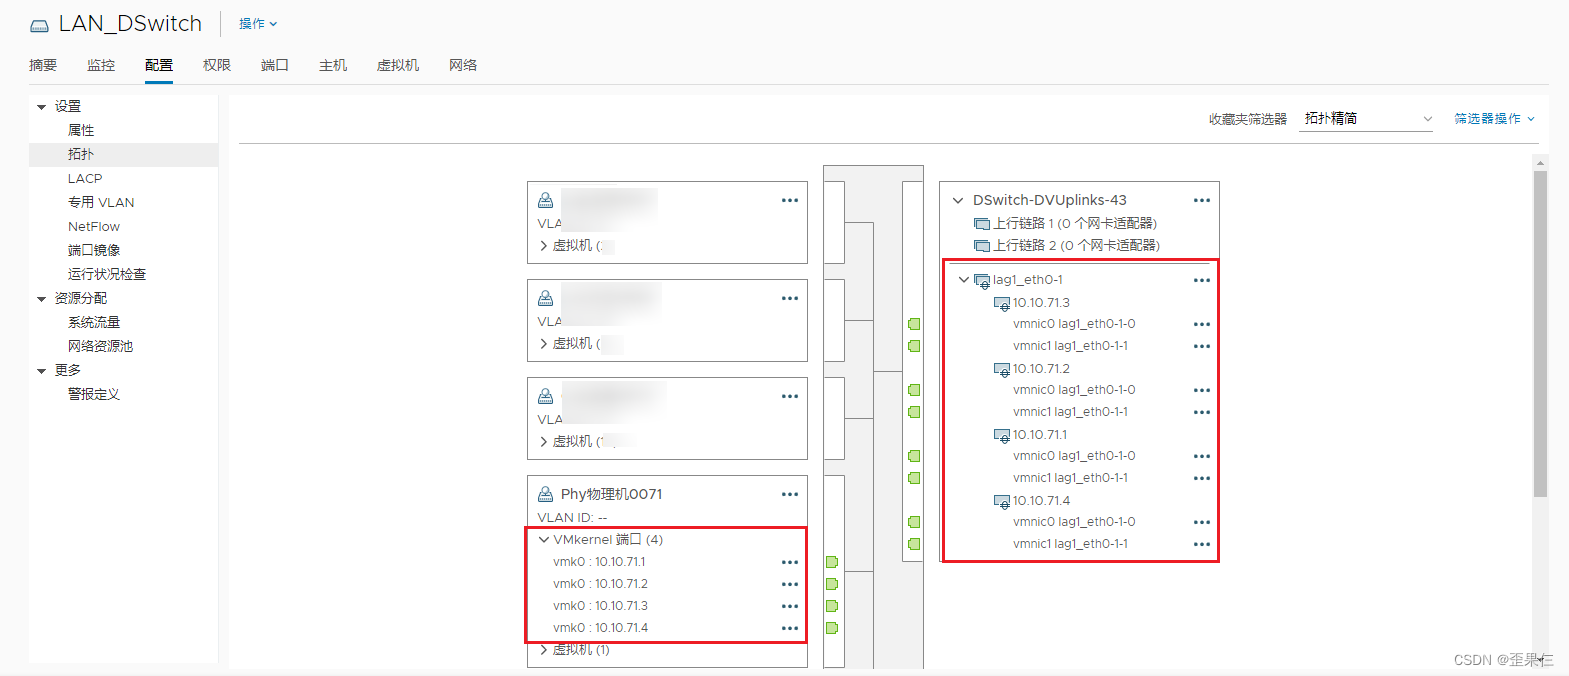 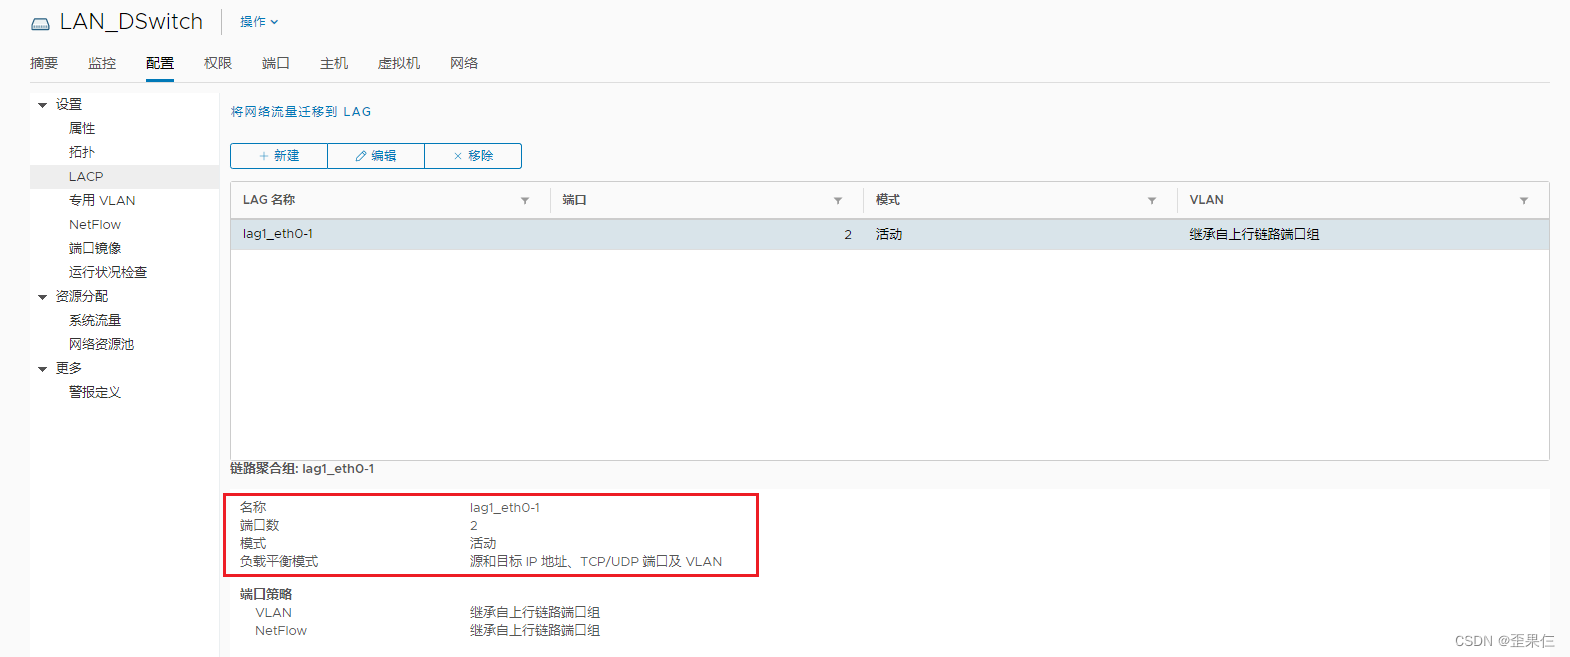 验证交换机的Eth-Trunk配置 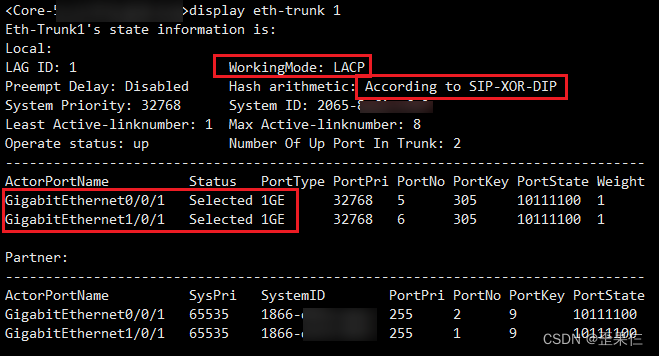 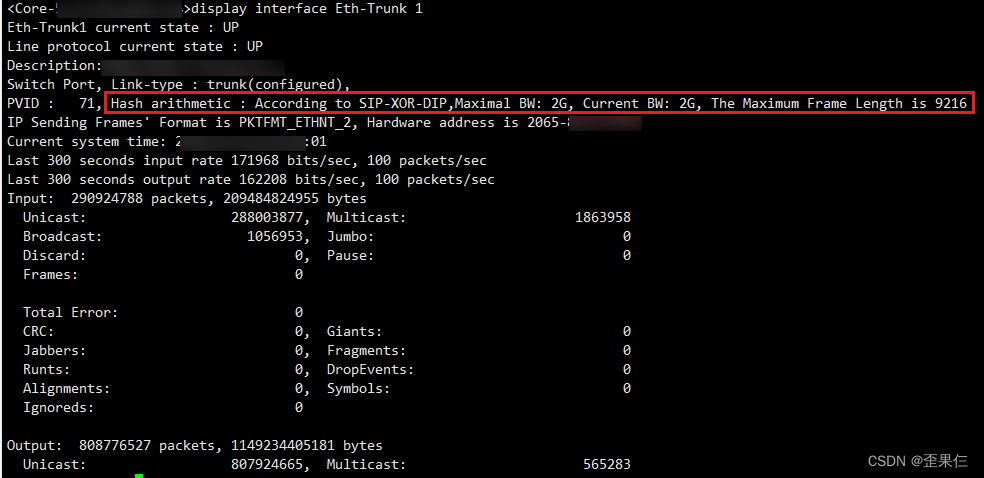 新建分布式端口的注意事项 vCenter创建分布式端口时如果不手工配置【绑定和故障切换】,那么分布式端口会自动继承到ESXi的主机配置文件,但ESXi的主机配置文件此时还没有配置,所有分布式端口组的配置得手工完成。 vCenter的上行链路统一使用LACP聚合模式,在新建分布式端口组时要关注如下几点: 交换机部分 1.1. 互联vCenter的交换机的互联口Eth-Trunk口要放通指定VLAN 1.2. 提供DHCP服务的交换机新建ip pool配置和VLANif配置 1.3. 所有内网网管交换机要新建指定的二层VLAN vCenter部分 2.1. 新增的分布式端口组按照指定的命名规范 2.2. 分布式端口组的VLAN类型选“VLAN”,填写VLANID 2.3. 分布式端口的【绑定和故障切换】配置与其他分布式端口组保持一致 2.4. 其他配置不动,保持默认 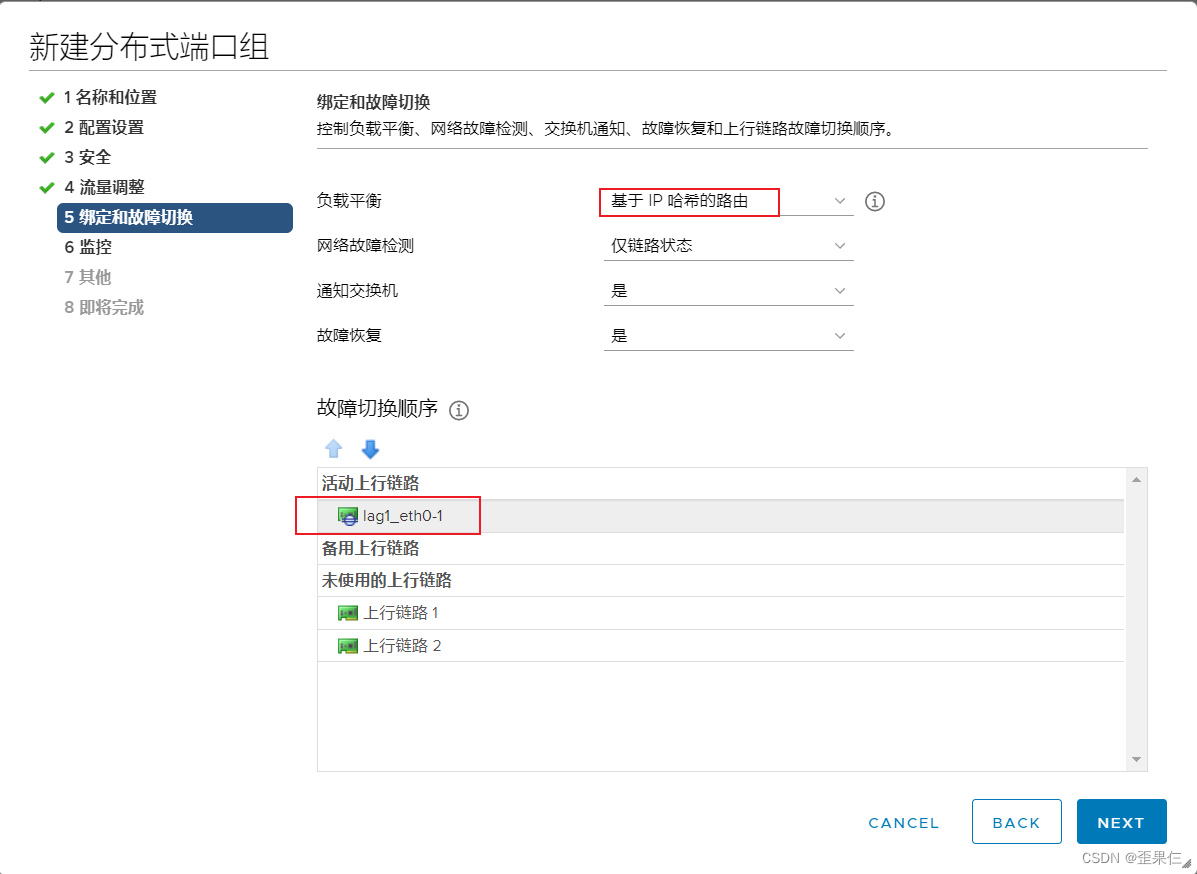 其他优化:部署模板虚拟机 命名规范 模板虚拟机的命名规范是 Templat_操作系统_简短版本 明确版本 ,如: CentOS 7.6 Minimal 1810 命名为:Templat_CentOS 7.6 Minimal 1810 CentOS 7.9 Minimal 2009 命名为:Templat_CentOS 7.9 Minimal 2009 Windows Server2016 命名为:Templat_Windows Server2016 Windows10 LTSC 2021 命名为:Templat_Windows10 LTSC 2021 模板虚拟机初始配置 CentOS的操作系统用于模板虚拟机的CPU、内存统一分配到2vCPU * 1,2GB内存 CentOS系统盘的磁盘容量为40GB(root目录使用LVM卷的配置,可自行扩容) 网络的分配先固定到测试的网段,后续转换模板虚拟机时需清除网卡配置再转换,预防与内网IP产生冲突。 CentOS系列的推荐安装流程 选择Shanghai时区 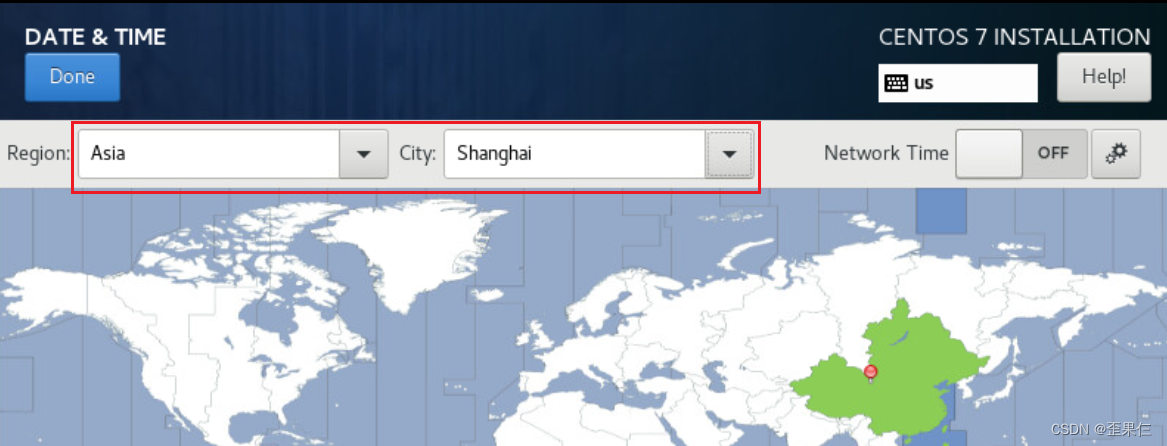 添加中文的键盘布局,方便中英切换 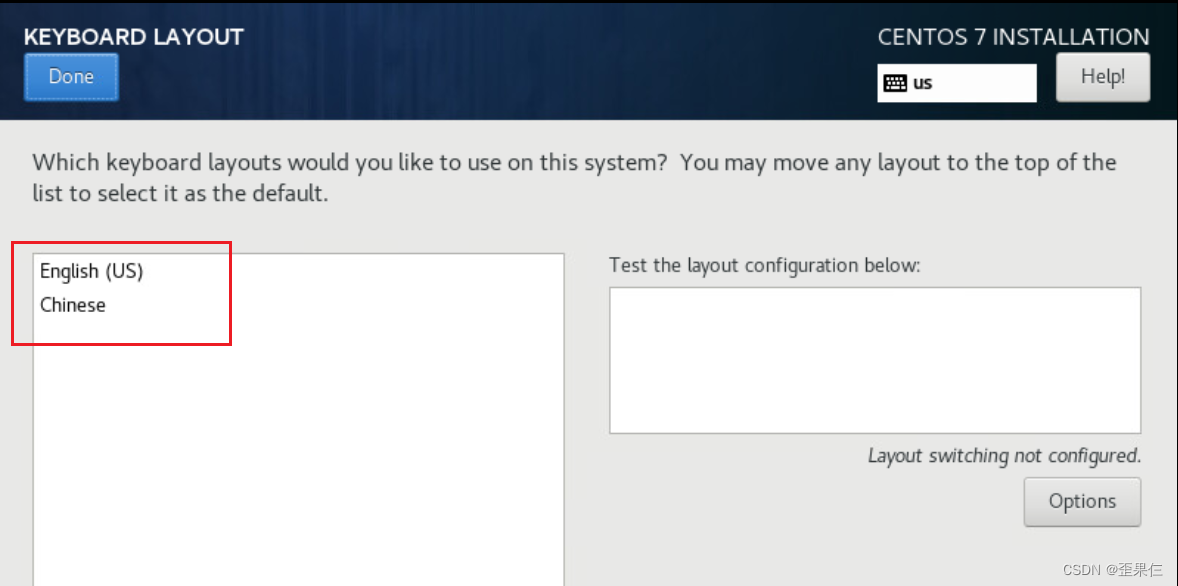 添加中文的语言支持  CentOS系统的最终内存暂不确定,所以不明确分配swap分区,这里的磁盘分配将使用自动分配。 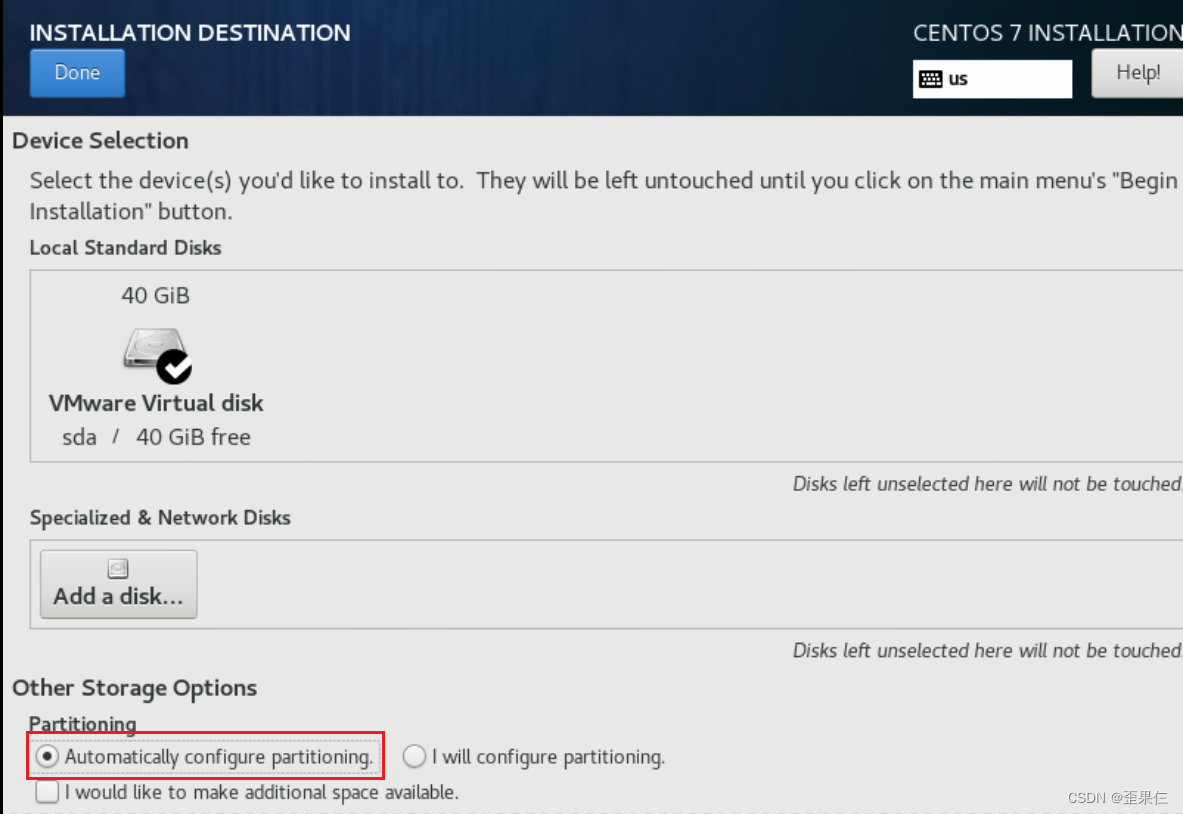 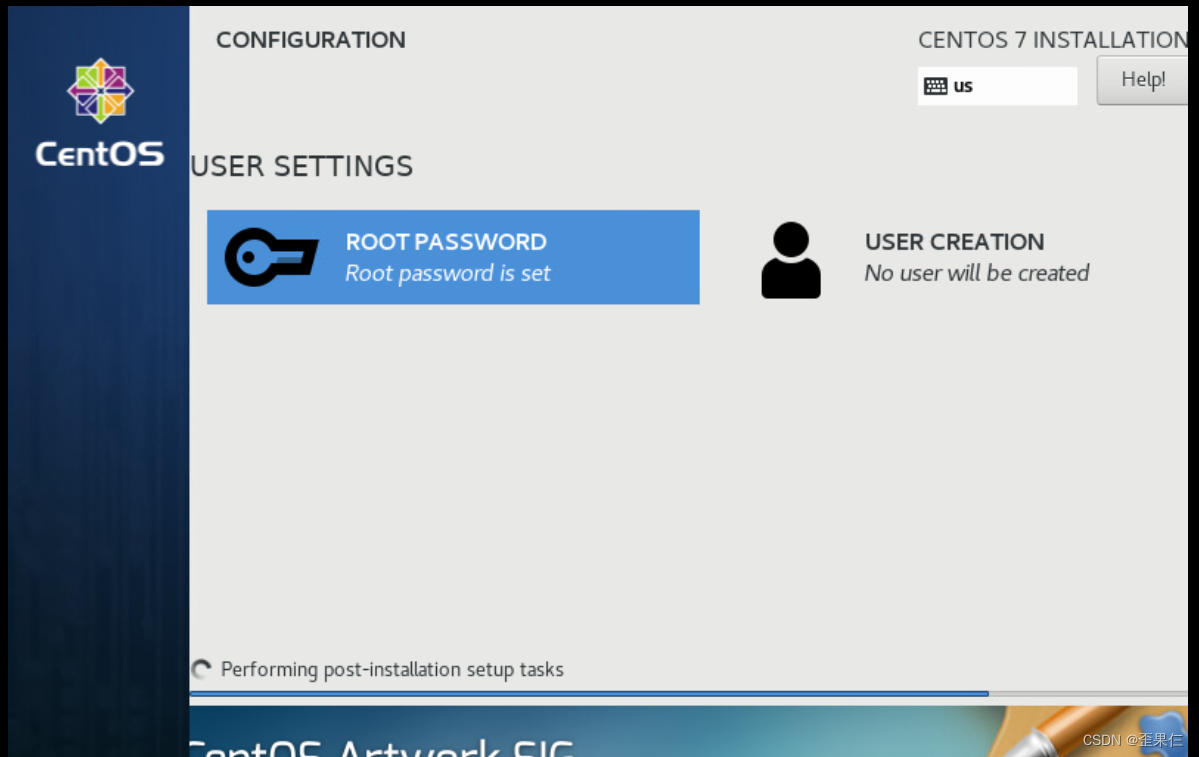 安装好CentOS系统,在vCenter上把CD/DVD光驱设置成客户端设备 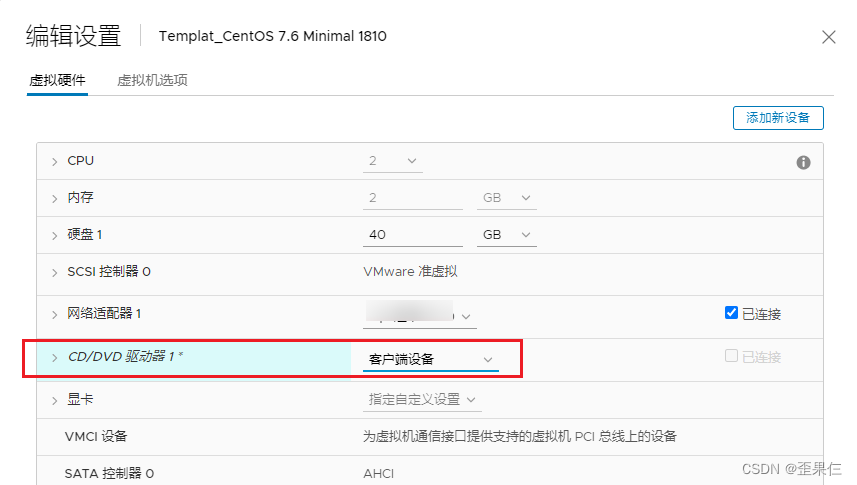 初始化部署系统之后,配置网关(CentOS默认网关的名称从ip addr里查看) ``` vi /etc/sysconfig/network-scripts/ifcfg-ens192 BOOTPROTO=static ONBOOT=yes IPADDR=192.168.100.50 PREFIX=24 GATEWAY=192.168.100.254 DNS1=192.168.200.1 DNS2=192.168.200.2 :x systemctl restart network ``` 补充系统必备的工具类软件 ``` yum update -y yum install vim tcpdump lsof zip unzip strace traceroute net-tools bind-utils whois wget ftp nc lrzsz -y ``` 配置开启sshd服务 ``` vi /etc/ssh/sshd_config Port 22 PermitRootLogin yes PasswordAuthentication yes :x systemctl restart sshd ``` 清除网卡配置,关闭network服务 ``` vim /etc/sysconfig/network-scripts/ifcfg-ens192 IPADDR=x.x.x.x PREFIX=xx GATEWAY=x.x.x.x DNS1=192.168.200.1 DNS2=192.168.200.2 :x systemctl stop network ``` 虚拟机关机后转换为模板虚拟机  参考来源 VMware官方文档 https://docs.vmware.com/cn/ VMware vSphere 6.5配置系列(四)为管理网络创建分布式交换机 https://blog.csdn.net/xiezuoyong/article/details/85164827 转自:https://blog.csdn.net/m0_54768192/article/details/127255084 标签: esxi, vcenter 本作品采用 知识共享署名-相同方式共享 4.0 国际许可协议 进行许可。